Punch needle embroidery opens a door to tactile, fast-moving textile work that rewards patience with incredible texture and color. Part craft, part sculptural surface design, it’s approachable for beginners yet rich enough for lifelong exploration. This article walks through origins, tools, basic techniques, setups for a first project, troubleshooting, finishing methods, and creative directions so you can start punching with confidence.
What is punch needle embroidery and why it matters
Punch needle embroidery uses a hollow needle to push yarn through a fabric, creating loops on the front side that form a raised, tufted surface. Unlike traditional counted embroidery, punch needle builds texture quickly and often feels more like rug hooking or tufting than cross-stitch. The practicality of the technique—speed, forgiveness, and tactile results—has made it popular with fiber artists and makers who want immediate, satisfying progress.
This method adapts well to a wide range of styles, from primitive folk motifs to detailed pictorial designs. Because the loops can be left intact or sheared, you can create both plush, rug-like surfaces and low-profile embroidered pieces. Its accessibility also makes it a favorite in community workshops and craft nights, where learners see dramatic results in a single afternoon.
Short history and roots of the technique
Punching tools and looped textiles have existed in many cultures for centuries—variations of the technique show up in Ottoman Ottoman textiles, Scandinavian rag rugs, and Chinese loop pile traditions. Modern punch needle embroidery as a hobby evolved from these traditions and from industrial tufting tools adapted for hand use. In the 20th century, craft books and kits helped spread a simplified form suitable for home stitchers.
In recent decades a revival among contemporary makers has broadened the technique’s expressive potential. Artists are expanding the vocabulary of punch needle beyond rugs into wearable art, sculptural wall hangings, and mixed-media installations. This renaissance blends traditional methods with fresh color palettes, new fibers, and experimental formats.
Essential tools and materials
Getting started requires just a few items: a punch needle, a tightly woven fabric (monk’s cloth, weaver’s cloth, or linen), yarn or specialized thread, and a frame or hoop to hold the fabric taut. These basics let you explore the craft immediately without a big upfront investment. I often recommend beginners start with one reliable needle, a small hoop, and a few skeins of yarn to keep decisions simple.
As you grow more curious, additional tools like transfer pens, thimbles, and backing fabrics become useful. Decorative finishings—zipper inserts for pillows or specialized rug backing—open more practical uses for your pieces. Choosing the right combination of tools and materials is part of the pleasure; small changes in yarn, needle size, or fabric can dramatically alter the look and feel of your work.
Punch needles: types, sizes, and selection tips
Punch needles look like hollow tubes with a handle and a small adjustable or fixed tip. They come in different sizes that accept different yarn weights and create loop heights. Common categories include fine needles for embroidery thread or fine wool, medium for worsted weight yarn, and large for bulky yarn or rug work. There are also hollow punch needles that accommodate a range of threads and ergonomic handles for longer sessions.
When choosing a needle, consider the yarn you want to use and the scale of your design. A needle that is too small will snag bulky yarn; too large a needle will make tiny yarns slip. Many makers buy a small set of needles so they can experiment; that variety makes it easy to switch from delicate motifs to chunky textures without frustration.
Fabric choices and frame options
The right foundation fabric keeps loops secure and defines the density of your finished piece. Monk’s cloth and weaver’s cloth are popular because their weave holds loops firmly, but quality linen, tightly woven cotton, and some canvas varieties also work well. Avoid loosely woven fabrics that allow loops to pull through; those won’t maintain the tufted surface over time.
Frames and hoops hold fabric taut and provide a comfortable working surface. Embroidery hoops are useful for small pieces, while adjustable punch needle frames or stretcher bars are better for larger panels. A couple of clamps or a stand-mounted frame can make long sessions less tiring and deliver more consistent results, especially when working expansive designs.
Yarn and thread: fiber content and weight
Yarn dramatically influences texture and longevity. Wool offers warmth, resilience, and a natural loft, while acrylics are durable, affordable, and easy to clean. Cotton and linen create flatter textures suitable for detailed imagery or wearables. Blended yarns balance tactile qualities and practical needs, like washing or colorfastness.
Weight matters: fine yarns yield delicate loops and detail, while bulky yarns build plush pile quickly. Consider sample swatches when trying new fibers; a short punched test shows how the yarn behaves with your needle and fabric. For pieces subject to wear—rugs, pillows—choose hardy fibers and check for colorfastness before finishing a piece you’ll launder or walk on.
Basic punch needle technique
The core action is simple: push the hollow needle through the fabric from the front side, then pull it back to leave a loop on the surface. The depth of insertion, the yarn traveling through the hollow needle, and the fabric tension all determine loop size and consistency. Learning consistent rhythm and hand placement makes the motion feel second nature within a few hours of practice.
Begin by practicing small, even loops across a test swatch. Work in rows like you would with machine tufting, keeping the needle’s point parallel to the fabric as you move. This orientation guides even loop formation and prevents the needle from grabbing or tearing the threads of your ground fabric.
Setting the loop height and tension
Loop height is set by the distance the needle is inserted through the fabric and by the type of needle you use. Some needles have an adjustable depth gauge allowing you to set consistent loop heights; other techniques rely on a steady hand and visual checking. Hatched stitches and deliberate changes in depth let you create dimension and highlight areas within a design.
Tension is the partner to loop height. Fabric must be pulled tight across a hoop or frame; otherwise, loops become uneven and the surface looks irregular. I recommend stopping every few minutes to smooth the fabric and check for slack, because corrections are far easier before many rows have been punched.
Working direction and keeping consistent rows
Most stitchers work in horizontal rows from left to right or right to left, depending on handedness. However, working in diagonal or concentric patterns can enhance certain designs and minimize visible row lines. Try both linear and organic directions to see which complements your pattern best.
Consistency comes from small habits: steady pace, uniform needle insertion angle, and mindful yarn feeding. For me, humming a light rhythm while punching keeps my pace even and my loops regular—little rituals like that make a practical difference during long sessions.
Preparing a pattern and transferring designs

Designs can be as simple or complex as you want—abstract shapes, repeat patterns, detailed portraits. For beginners, start with bold shapes and limited colors. Complex shading and tiny details require finer needles and thread, so build toward those techniques after you’re comfortable with basic loop formation and fabric control.
Transferring a pattern is straightforward: trace or draw your design onto the fabric with a washable marker or transfer paper. Many artists prefer lightweight markers that disappear with water or fade with time. If your foundation fabric is too dense to see a drawn design, use a printed pattern underneath a lightbox or hold the fabric against a window during the daytime.
Scaling a design and choosing color palettes
Scale changes impact both visual clarity and the physical feel of a piece. Large, bold motifs look great with thick yarn and larger needles, while small, intricate scenes require fine thread and careful control. Decide on scale before transferring a design so your needle and yarn choices align with your creative vision.
Color decisions are part intuition and part practical mixing. Work with a limited palette at first—three to five colors—to avoid visual noise. Gradually introduce shades for gradients and subtle highlights. A small test swatch demonstrating color relationships helps prevent surprises when you fill a larger area.
Starting your first project: step-by-step
Begin with a small, contained project like a decorative patch, coaster, or mini wall hanging. These let you practice technique and finishing methods without a huge time commitment. Gather your tools, draw a simple design, and set a modest goal like finishing one motif in an afternoon.
Here’s a simple workflow: transfer the design, mount the fabric in a hoop, thread your needle, and work in short sessions to keep tension steady. Pause periodically to trim stray fibers, realign yarns, and evaluate the piece from different distances. Small habits early on prevent compounding problems later in the project.
- Materials checklist: punch needle, suitable fabric, yarns, hoop/frame, washable marking tool, scissors.
- Workspace setup: strong natural light, comfortable chair, flat surface for tools, small container for yarn ends.
- Practice routine: 15–30 minute practice blocks, followed by 10-minute review of tension and loop uniformity.
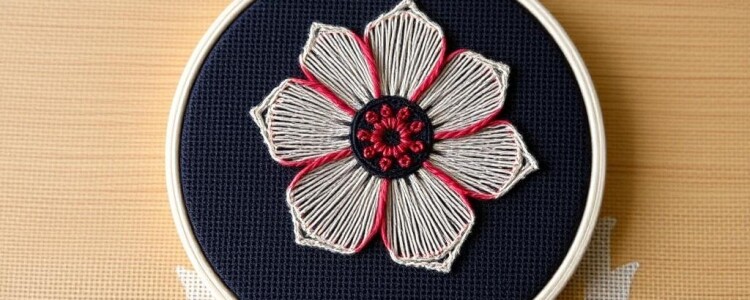
Example project: a simple flower patch
For my first intentional piece, I designed a small flower patch, roughly 4 inches across, using bulky wool for petals and a contrasting center. The project taught me how loop heights affect the illusion of petal curvature and how color contrast defines edges. Completing it in one afternoon boosted my confidence more than any tutorial could.
To replicate: transfer a five-petal outline, start with the center in a dense, low loop, and work outward with taller loops for petals. Finish by trimming some petal loops for highlights and securing the back with a simple adhesive backing or sewn fabric to contain the yarn. It’s an ideal gift or patch for a bag or jacket.
Troubleshooting common problems
Even with simple technique, stitchers encounter problems: skipped loops, uneven pile, yarn twist, and fabric puckering. Each issue has predictable causes and straightforward fixes, so framing problems as solvable rather than fatal keeps the process enjoyable. A little diagnostic testing goes a long way before committing to a large piece.
Start by isolating variables: change only one factor at a time (needle size, yarn, or fabric tension) to see its effect. Keep a small notebook or photos of test swatches so you can replicate setups that produced desirable results. This careful approach saves time and frustration in the long run.
Skipped stitches and loose loops
Skipped stitches often indicate a needle that’s too small for the yarn or a tension issue with the fabric. Switching to a larger needle, tightening the hoop, or using a slightly thicker yarn will usually solve this. If loops remain inconsistent, punch a few extra rows and re-evaluate your insertion angle to make sure the needle goes in at an even, parallel orientation.
Loose loops can be corrected by reducing needle depth or increasing fabric tension. On finished pieces, a light adhesive backing or a sewn stabilizer can lock loops in place for items that will see wear. Preventative care—routine tension checks and short work sessions—reduces the need for corrective measures.
Puckering, tearing, and needle jams
Fabric puckering usually stems from overly tight stitching, uneven hoop tension, or frequent pulling on yarn ends. To fix it, release the fabric slightly in the hoop and re-smooth, then continue punching with a gentler touch. If tearing occurs, gently secure the area with fusible backing or fabric glue and proceed more cautiously, selecting a sturdier foundation fabric next time.
Needle jams are often caused by yarn fibers compacting inside the hollow shaft. Clearing the needle regularly or switching to a brand with a wider channel reduces jams. If a needle becomes clogged mid-project, moving to a new needle and carefully unthreading the old yarn helps minimize damage to the work.
Finishing techniques and securing your work
Finishing transforms a raw punched panel into a usable object. Simple methods include trimming loops for a shaggy pile, shearing for a uniform surface, or leaving loops intact for a plush effect. Decide early whether your piece will be a wall hanging, pillow, rug, or wearable, because finishing strategies differ by end use.
Securing the back is critical for durability. Many makers use a fabric backing stitched or glued on, while rug makers often use a latex or rubberized backing for washable, safe floors. For decorative wall pieces, a glued and stitched linen backing works well and keeps the back tidy for hanging or framing.
Backing, trimming, and washing
Apply a backing fabric to hide knots and stabilize loops. Fusible interfacing smooths irregularities and provides a neat surface for framing or sewing into a cushion. For washable items, choose colorfast materials and test a small swatch first to ensure no bleeding or shrinkage occurs.
Trimming creates deliberate textures and patterns; a careful pair of sharp scissors or a small electric trimmer makes short work of shearing loops to uniform heights. After trimming, a gentle steam or light pressing on the back (never on the looped surface) flattens stray fibers and enhances the finished look.
Mounting and framing options
Wall pieces can be mounted on stretcher bars, framed in shallow box frames, or attached to dowels for a bohemian look. Mounting on stretcher bars mimics canvas painting and shows off three-dimensional texture cleanly. Box frames protect the pile and give a polished gallery feel, while dowels and loops suit casual displays and textile-focused interiors.
When framing, leave small gaps between the pile and glass—direct glass contact can crush loops and ruin the dimensionality. Instead, use shadow boxes or a spacer to maintain depth and protect the surface. Proper framing prolongs the piece’s life and emphasizes its sculptural qualities.
Creative applications and design inspiration
Punch needle work suits a surprising variety of projects: wall art, rugs, cushion covers, wearable patches, and mixed-media collages. Because the technique is fast, it’s perfect for market pieces or gifts where you want visually strong results without long timescale investment. Designers are also applying punch needle to upholstery accents and sculptural textile work.
Personal projects often blend techniques. I once paired a small punched panel with hand embroidery and painted details to produce a compact, layered landscape that read as both painting and textile. That hybrid approach highlighted how punch needle can anchor texture while other media insert fine-line detail and narrative.
Design ideas to try
- Abstract color fields: large shapes and bold color blocks with varied loop heights.
- Botanical panels: layered petals and leaf textures with mixed yarn weights for depth.
- Wearable patches: small motifs for jackets and bags using durable yarn and secure backing.
- Mini rugs: low pile and durable fibers tailored to entryways and bedside areas.
Each idea can be scaled up or down and combined with other techniques like quilting or needle felting. The tactile nature of punch needle means motifs read well from a distance and reward close inspection with rich texture.
Care and maintenance of punch needle pieces
How you care for a piece depends on fiber content and intended use. Decorative wall hangings need only periodic dusting with a soft brush or gentle vacuuming through a screen. Functional items like rugs or cushions will require more attention—spot cleaning, careful handwashing, or professional cleaning depending on the fibers used.
For washable pieces, always test a swatch and use gentle detergents and cold water to avoid felting or color bleeding. Dry flat and avoid wringing. For wool, consider professional cleaning for larger items, especially if the piece incorporates multiple fiber types that react differently to water and heat.
Repairing and refreshing older work
Even well-made punch needle pieces may need occasional repairs: loose loops can be re-punched, and faded areas touched up with matching yarn. Keep spare yarn ends when finishing a project—that small act makes later repairs far easier. If a hole or worn patch occurs, carefully remove a few surrounding loops, insert new yarn, and rebuild the surface in small increments to blend texture.
Professional restretching and rehabbing can revitalize pieces that have sagged over time. Textile conservators can advise on appropriate backing and re-mounting materials to preserve historical or sentimental work, especially for pieces with fragile or vintage fibers.
Advanced techniques and experimentation

Once comfortable with basics, many stitchers explore shading, color blending, and layered textures that push punch needle beyond surface patterning. Techniques borrowed from painting—like underpainting, glazing, and scumbling—translate into yarn selection and pile variation. The result can be painterly pieces that read like landscapes, portraits, or abstractions.
Layering loops of different heights creates shadow and depth, while clipping selectively produces highlights. Combining punch needle with beadwork, embroidery, or appliqué adds points of contrast and focal detail. Experimental makers also incorporate unusual materials—ribbon, metallic threads, leather strips—to produce hybrid textures that surprise and delight.
Color blending and shading tricks
Color blending works best when you plan transitions and test small gradients in advance. Overlap two similar shades in adjacent rows and use a third intermediate tone to soften the transition. Alternating yarns—two rows of one color, then two rows of another—creates subtle cross-hatching that reads as gradient from a distance.
Use darker and cooler tones in recessed areas to suggest depth, and reserve lighter, warmer tones for raised areas. This palette thinking, paired with loop height variation, yields convincing three-dimensional effects even in relatively small pieces.
Where to learn more and community resources
Learning options range from books and local workshops to online video tutorials and global communities. Books offer structured technique and patterns, while videos and live workshops reveal hand positioning and pace that static images cannot. Local guilds and fiber festivals often include punch needle classes and supply vendors where you can try different needles and yarns in person.
Online communities—forums, social media groups, and course platforms—are excellent for feedback and inspiration. Share progress photos, ask focused questions, and swap small trouble-shooting tips; the communal aspect accelerates learning and keeps motivation high. I learned many of my favorite finishing tricks from a small online group where makers posted step-by-step images of their processes.
| Needle size | Recommended yarn | Typical use |
|---|---|---|
| Fine | Embroidery thread, fingering weight yarn | Delicate detail, small patches |
| Medium | DK to worsted weight yarn | General projects, wall art, small cushions |
| Large | Bulky and super-bulky yarn | Rugs, large textured panels |
Getting comfortable with your own style
As you practice, you’ll find tendencies that define your approach—color preferences, favorite motifs, and favored yarns. Embrace this emergent voice; it’s the most reliable path to distinctive work. Experimentation is the engine of personal growth, but a few consistent tools and materials anchor your development and make progress measurable.
Document experiments in a sketchbook or digital folder. Photos, notes about needle sizes, yarn brands, and what worked versus what didn’t turn random trials into a practical reference library. Over time, these records become the scaffolding for more ambitious, cohesive projects.
Practical next steps to begin punching

To start, assemble a small trial kit: a mid-size punch needle, a 6–8 inch hoop, a swatch of monk’s cloth, and two or three yarn colors. Spend an hour making uniform rows, then create a small motif like a heart or leaf to practice shaping. That single, focused exercise covers the most important variables: loop control, tension, and color placement.
Join a local class or online workshop for immediate feedback on technique, or follow a step-by-step video and pause frequently to compare your work. With simple, steady practice and careful finishing, you’ll have a small, satisfying piece to show after your first afternoon—and that’s exactly the kind of encouragement that keeps a new maker going.
Punch needle embroidery rewards curiosity more than perfection. Begin small, test materials, and lean into mistakes as learning moments. Soon you’ll be making pieces that are as tactile as they are visual—objects that invite touch, invite conversation, and occupy a unique place between craft and art.


