There’s a particular hush when you pull an old tee or a well-worn jacket from a box and let the fabric tell its story. Turning those garments into a quilt gives the stories a new life — a woven narrative you can fold, drape, and pass along. Creating a memory quilt from special clothing blends practical sewing with careful curation; it’s a craft that rewards patience, thought, and a little technical know-how.
Why make a memory quilt
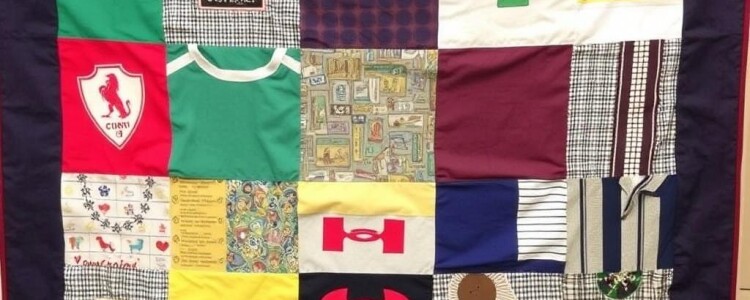
Memory quilts do more than warm your body. They bundle fragments of daily life into an object that invites touch and recall, turning clothing from mere fabric into something that carries voice and presence. People make them after significant life events, to comfort grieving families, to mark a milestone, or simply to preserve the ordinary items that stitch a life together.
The act of making a quilt is an intentional rehearsal of memory. Each square can hold a specific moment — a concert T-shirt, a baby onesie, a collar with a faint smell of the person who wore it. That concentration of detail can make the quilting process almost meditative, as you handle the material and decide which patches belong side by side.
Beyond emotion, a memory quilt is practical preservation. Fabrics that might otherwise fade, lose seams, or be tossed away are stabilized and protected inside a quilt sandwich of batting and backing. If filmed and labeled correctly, a quilt can also convey provenance: who wore the item, when, and why it mattered.
Choosing which garments to include
Start by gathering everything you might want to include in one place and taking an inventory. Lay out shirts, dresses, jackets, baby clothes, uniforms, and even soft accessories like scarves. Don’t panic about the volume yet; it’s easier to cull later than to wish you’d saved something you discarded.
Consider the emotional weight and the physical qualities of each garment equally. A favorite sweater may be threadbare but priceless in memory; a pristine blouse might be less evocative. Also note fabric types — knits, denim, silks, and synthetics behave differently when washed, cut, and sewn, so group similar materials together for planning.
Talk with relatives or others connected to the clothing when possible. Sometimes the backstory adds the final push to include a particular item. Recording short notes about each piece — who wore it, when, and a memory attached — will help you later when arranging blocks and adding labels.
Planning the layout and design
Deciding how the quilt will look before cutting starts is the clearest path to a cohesive result. Think of the quilt as a gallery wall; you want balance in color, texture, and scale. Sketch a few layouts on paper or use a digital tool to experiment with different arrangements before you commit.
Decide whether you want a strict grid, an improvisational patchwork, or a mix of framed blocks and sashing. Grids are forgiving and lend themselves well to uniform items like T-shirts. Improvisation feels organic and works beautifully when garments vary dramatically in size and pattern.
Create a mock layout on the floor or a large table. Moving fabric pieces physically gives you a sense of rhythm you can’t get from a photo. Photograph each arrangement so you can refer back to it as you cut and sew; sometimes a favored configuration looks different once pieces are cut to exact sizes.
Block sizes and quilt dimensions
Choose a block size that honors the fabric and the image or detail you want to keep. Common sizes are 8, 10, 12, or 16 inches square, but you can mix sizes for visual interest. Larger blocks preserve recognizable logos, pockets, or text; smaller blocks are useful for busy or fragile garments where only snippets are usable.
Calculate how many blocks you’ll need by multiplying the number of blocks across by the number down, then convert to finished dimensions by adding seam allowances and sashing if used. For example, a 6-by-8 grid of 12-inch finished blocks yields a 72-by-96-inch quilt before borders. Allow extra for borders and shrinkage if working with natural fibers.
Remember to include seam allowances in your calculations: a typical quarter-inch sewn seam becomes a half-inch change between adjacent blocks. If you’re new to quilting, consider adding a thin sashing between blocks to give yourself more forgiving seams and a framed look that highlights individual garments.
Color, texture, and story flow
Arrange blocks to create a narrative flow rather than clustering all similar items together. Place a child’s onesie near a parent’s worn sweatshirt to suggest relationships. Mix heavy textures with soft ones to create tactile contrast, and place bold patterns sparingly so they don’t dominate the whole quilt.
Pay attention to color temperature: warm tones can group together to create a comfortable visual zone, while cooler shades can provide rest for the eye. Neutral sashing or a unifying border can visually tie disparate pieces together without muting their individuality.
Think about reading order if the quilt is intended to be a storytelling piece. You can arrange blocks chronologically, thematically, or by person. A deliberate layout makes the quilt feel curated rather than random, and it enhances the emotional impact when viewers trace the sequence of memories.
Preparing clothing for cutting
Proper preparation preserves prints, labels, and unique details while making the fabric safe to sew. Start by documenting key elements of each garment with a photo and a brief written note. This record preserves the story even if the garment’s original configuration is altered during cutting.
Wash or dry-clean garments according to their safest care instructions before cutting; this removes oils, odor, and sizing chemicals that might interfere with later treatments. Use a gentle wash and air dry if you’re unsure — many quilts are better off without additional shrinkage surprises after piecing.
Press fabrics gently with the appropriate iron setting to flatten seams and remove wrinkles. Flattened fabric is easier to measure and cut accurately, and pressing allows you to see imperfections and stains that might influence where you cut or whether to include a piece at all.
Cleaning and stabilizing fabrics
Fragile fabrics and older garments may need stabilizing before cutting to prevent tearing. Lightweight stabilizer or lightweight fusible interfacing can be tacked to the back of a delicate print to give body and stitchability. Test a small hidden area first to confirm there’s no visible change on the front side.
If garments have frayed hems or weakened seams, consider reinforcing those areas with a straight stitch or narrow zigzag along the seam line before cutting. This simple step keeps edges intact and reduces the risk of lost fragments while you work.
For garments with sentimental embellishments such as beads or sequins, deciding whether to remove, relocate, or encapsulate them is critical. Removing embellishments can preserve them for later use; encapsulating means sewing them onto a stabilizing fabric patch to keep them in place within the quilt block.
Transferring motifs and pockets
Pockets, logos, or appliqués often hold the strongest memories and can be the centerpiece of a block. Carefully cut around these elements with a generous seam allowance so you can frame or appliqué them onto a sturdier foundation. A rotary cutter and sharp blade help get crisp edges.
When a motif must stay intact on a fragile fabric, use a backing piece of muslin or cotton and baste the motif to it before trimming the excess. This stabilizing base prevents distortion and makes it easier to sew the motif into the quilt without losing its original shape.
Consider preserving functional elements like zippers or buttons as well. A shirt placket with buttons can become a tactile, interactive feature on a quilt. If you want the buttons to remain usable, reattach them to a reinforced patch rather than sewing straight through their shanks into the quilt batting.
Cutting, piecing, and preserving details
Cutting is where the project transforms from a pile of clothes into a future quilt. Measure twice and cut once, using clear rulers and a stable cutting surface. A rotary cutter with a fresh blade provides the cleanest cuts, especially on knit fabrics where scissors can leave jagged edges.
Preserve collars, cuffs, and labels by cutting with an ample seam allowance so these features can be framed or incorporated whole in a block. In some cases, leaving an entire shirt front or back intact gives you a stronger, more meaningful centerpiece for a larger block.
Keep a small box for scraps. Even tiny leftover triangles can become cornerstones in a scrappy sashing or a binding accent. Some scraps might also hold the last bit of a loved one’s handwriting printed on a fabric tag, which deserves preservation in some form.
Preserving seams, collars, and labels
Many people want to keep original seams for authenticity. If so, transfer them to a backing using hand basting or machine stitching to keep the seam line visible without risking further unraveling. Press seams flat so they lie nicely within the block.
Collars and lapels make excellent focal points. Mount them on a stable background with a few hand stitches that anchor the shape but keep the look natural. You can pad collars slightly with batting for a dimensional effect if the rest of the quilt is fairly flat.
Labels are history in miniature. Either stitch labels onto a corner of the corresponding block or create a special “label panel” with several garment tags grouped together. Use archival thread and a tight running stitch to keep fabric tags in place without damaging them.
Patchwork techniques
Standard piecing uses a consistent seam allowance — typically a quarter-inch — for predictable assembly. Chain piecing is a time-saving practice where you sew one seam after another without cutting the thread, reducing handling and speeding up production. Press seams in a consistent direction to make future machine quilting easier.
If garments vary widely in weight, consider piecing lighter fabrics onto sturdier cotton squares first, creating hybrid blocks. This method stabilizes the lighter pieces and simplifies joining blocks that would otherwise pull or pucker when seamed directly to heavier pieces.
For an art quilt feel, try raw-edge appliqué where the edges of garment patches are left slightly raw and allowed to fray artistically over time. Use a narrow zigzag stitch around the edges to slow the fraying and prevent structural failure while preserving a soft, lived-in look.
Sewing methods and tools

Your choice of tools can make an early-stage quilt feel like a joy or a battle. A reliable sewing machine with a straight stitch and a zigzag function covers most needs. A walking foot is invaluable when quilting multiple layers or odd textures to prevent shifting during stitch sessions.
Hand tools hold a place too: sharp fabric scissors for trimming, small snips for getting close to seams, and an array of needles for different fabrics. A seam ripper will be your friend if you need to reposition elements after test stitching. Investing in good-quality tools saves time and frustration.
Keep a kit with neutral thread colors, a selection of heavier threads for topstitching, and a supply of binding clips to hold bulky edges. Long quilting sessions are easier with a comfortable chair and good lighting; don’t underestimate how much posture and eye strain affect your stamina for focused work.
| Essential tool | Why it matters |
|---|---|
| Sewing machine (with zigzag) | Handles most seams and decorative stitching quickly and reliably |
| Walking foot | Prevents fabric layers from shifting, essential for quilting |
| Rotary cutter and ruler | Gives precise, straight cuts on multiple layers |
| Lightweight fusible interfacing | Stabilizes delicate fabrics and motifs for sewing |
| Neutral and colored threads | Neutral for structure; colored for visible topstitch detailing |
Hand stitching vs. machine work
Machine sewing is quicker and provides uniform seams, which helps when a neat, durable quilt is a priority. Many modern domestic machines can handle quilting layers with the right foot and needle. Machine quilting also makes it easier to use decorative stitches that bind and decorate simultaneously.
Hand stitching gives you control in tight or delicate situations where a machine could damage the fabric. It’s ideal for attaching small patches, sewing on labels, or adding embroidered details. Hand quilting can add a personalized aesthetic that reads as intimate and handcrafted.
I often combine both: machine piece the bulk of the quilt, then hand quilt accents or add embroidered captions. This hybrid approach keeps the project manageable while preserving the intimacy of handwork in the final, visible layers.
Batting, backing, and quilting styles
Choosing batting affects warmth, drape, and weight. Cotton batting breathes and has a matte look, wool adds loft and warmth, and polyester holds shape and dries faster. Consider how the quilt will be used — draped over a sofa, as a bedspread, or hung on a wall — when selecting batt weight and type.
Backing fabric should complement the front without competing with the memories. A solid or gently patterned cotton can act as a visual rest, while a large print might hide stains and wear if the quilt will get heavy use. An archival cotton muslin backing preserves the quilt’s structure and feels traditional and calm.
Decide on a quilting style that serves the story and the structure. Echo quilting around motifs highlights them, while an all-over meander or stipple provides texture without drawing attention away from garment details. Straight-line quilting modernizes the look and can emphasize block geometry.
Choosing batting and backing fabrics
If you want a soft, drapey quilt for cuddling, choose a low-loft cotton or bamboo batting. For a showpiece that holds its shape on a wall, medium loft wool or a cotton-poly blend will give structure. Always pre-wash backing fabrics if they are likely to shrink, so the quilt remains flat after laundering.
Backing patterns can be used to hide seams or unify disparate front fabrics if you prefer not to add a border. A deep, rich color on the back can make the front colors pop, while a neutral back keeps everything understated. Test a small sample with your chosen batting to judge the feel before assembling the full sandwich.
For quilts destined for frequent display or use, consider backing fabric with a tight weave and moderate weight. It resists wear better than very lightweight prints and provides a sturdier surface for quilting stitches to anchor both layers together over time.
Quilting patterns to enhance story
Use quilting lines to draw attention to certain blocks or to literally trace stories across the quilt. For example, quilt a winding path connecting blocks representing stages of life, or stitch concentric circles around a child’s onesie to suggest protection and warmth. Thoughtful quilting can become a second language in the piece.
When you want calm, choose a simple grid or parallel lines that let garments show without competing. For drama, use dense quilting around particular motifs and lighter quilting elsewhere. The density and direction of quilting can subtly shift the viewer’s eye and give rhythm to the overall composition.
Always test your planned quilting motif on a sample sandwich that includes a similar mix of fabrics and batting. This reveals how stitches behave and whether the motif causes unwanted puckering or distortion on mixed-material blocks.
Finishing edges and binding options

Binding completes the quilt and deserves as much thought as the front. Narrow single-fold bindings give a tidy look on quilts intended for display. Double-fold bindings are sturdy and forgiving, which is useful when joining bulky seams from thick garments.
You can use a strip cut from a meaningful garment as the binding to keep the memory theme running around the perimeter. If the garment has sentimental color or a pattern that complements the front, it makes a striking final frame. Stabilize thin or stretchy materials with interfacing before turning them into binding strips.
Another option is to create a faux piping by inserting a thin rope or folded contrasting fabric just inside the binding, which gives a polished, professional finish that outlines the quilt and protects the edges from wear.
Personal touches: embroidery, photos, pockets
Adding embroidered captions — names, dates, or short quotes — personalizes a quilt in a way that’s archival and elegant. Use embroidery floss or a small machine satin stitch for durability. Consider placing a short phrase near the corresponding block rather than a single big label; this integrates text into the story more naturally.
Photographs can be incorporated using printable fabric sheets or by stitching a photo onto a backing fabric and encasing it with a stabilizing frame. If you use digital transfers, follow the manufacturer’s washing instructions to protect the image over time. Test small samples for colorfastness and longevity.
Functional pockets are meaningful and practical additions. Sew a small pocket from a Bible ribbon or a cuff into a block to hold a handwritten note or a small heirloom. Pockets make the quilt interactive and give the owner a place to store the next generation’s memories as well.
Caring for and preserving your quilt
Memory quilts need gentle care. When laundering is necessary, use a front-loading washer on a delicate cycle with cold water and mild, pH-neutral detergent. Avoid bleach and heavy stain removers that could strip inks and prints from sentimental patches.
Air-drying flat is the safest method to prevent distortion; if space is limited, tumble dry on no heat with a couple of clean tennis balls to keep the batting lofted. Store quilts rolled on a tube or folded loosely with acid-free tissue to avoid permanent creases, and keep them out of direct sunlight to prevent fading.
For long-term archival storage, consider wrapping the quilt in cotton muslin or unbleached cotton and storing it in a cool, dry place. Avoid plastic storage that traps moisture and encourages mildew. Label storage boxes with contents and dates so future generations can identify the provenance without opening the box unnecessarily.
Sharing and gifting the quilt
When a memory quilt is intended as a gift, presentation becomes part of the story. Include a small sewn-in pocket with a handwritten note describing the items included, the rationale for inclusion, and dates when relevant. Future owners will appreciate that curated context as much as the fabric itself.
Gift the quilt with care instructions and any laundry testing results you’ve done, especially if you used photo transfers or specialty threads. If you plan to pass the quilt down within a family, include a short ledger card with names, relationships, and any provenance you recorded while selecting pieces.
I made a quilt for my sister from our parents’ old shirts and smocks, sewing a small envelope with typed notes and a few extra buttons into a corner. She told me later that those notes made the quilt feel like a time capsule she could open, and knowing the origin of each square deepened her connection to the piece.
Troubleshooting common problems
Puckering and bubbling are frequent when combining fabrics with different behaviors. If this happens, check your tension, needle type, and stitch length. A slightly longer stitch length and a sturdier needle often tame puckering in bulky seams.
Another common issue is color bleeding, especially from dark denim or brightly printed synthetic fabrics. Pre-wash suspect items with a color-catching sheet, or consider stabilizing and isolating such blocks with a thin muslin frame before integrating them into the quilt.
If seams keep failing at intersections, reinforce them with a small hand stitch across the seam intersection on the back. Reinforcing stress points prevents future tears where the quilt will endure the most handling, like corners and high-traffic blocks.
Resources, patterns, and where to get help

Quilting guilds and local community centers are excellent sources of hands-on help. Members often have experience with repurposing garments and can offer tips specific to your fabric mix. Many guilds run memory-quilt workshops where you can learn practical techniques with peer support.
Online, look for tutorial videos that show the specific steps you plan to use — appliqué, raw-edge finishing, or photo transfer methods. Patterns for block sizes and sashing layouts are available at quilt shops and through reputable quilting bloggers; adapt these patterns to fit the unusual shapes and sizes that clothing often brings.
Artisan textile conservators can advise on preserving fragile or historically valuable garments. If an item has significant monetary or historical value, seek a conservator’s guidance before cutting or altering it. Their recommendations can prevent irreversible loss and ensure effective long-term preservation.
Final thoughts
Creating a memory quilt from special clothing is a deliberate act of preservation and storytelling that balances craft, care, and emotion. Every decision — which shirt to keep, where to place a pocket, what quilting to use — shapes how the story will be read and remembered. Work patiently, trust your instincts, and allow the quilt to evolve as the memories dictate.
Take breaks and step back often to view the piece from a distance. That perspective helps you see the overall cadence of color and texture, ensuring the quilt remains readable and resonant. When the project is complete, you’ll hold a layered record of life that’s as tactile as it is meaningful.
There’s no single “right” way to make a memory quilt. Techniques can be learned and adapted; the important thing is the care you put into each stitch and the stories you preserve for those who will hold the quilt long after you’re finished with it. Let the fabric speak, and make something that will be treasured for years to come.


