Crafting is equal parts making and showing; the way you present a finished piece changes how people see it. This article gathers practical ideas, visual strategies, and real-life experiments to help your work look intentional and alive rather than boxed away. Read on for layout tricks, lighting, repurposed materials, and hands-on tips I’ve learned while setting up shows and decorating my own home studio.
Why presentation matters as much as production
Presentation frames a maker’s voice: a well-displayed piece suggests thoughtfulness and invites closer inspection. People respond emotionally to context, and a simple change—a frame, a pedestal, a fabric backdrop—can transform something ordinary into something compelling. Think of display as part of the craft itself; how you present work is another layer of creativity to explore.
When I first sold at a local market, my booth was functional but anonymous and sales lagged until I rearranged items into curated vignettes. Suddenly customers lingered, asked questions, and the same items sold faster. That experience taught me that display is an investment with measurable returns: time spent arranging pays off in engagement.
Good display reduces friction between the viewer and the object, making it easier to understand scale, texture, and use. It also protects your pieces from damage and highlights your signature style, whether that’s minimal, rustic, colorful, or elegant. Consider presentation a tool for storytelling—your setup can suggest how an object fits into a buyer’s life.
Start with a plan: assess space and goals
Before you pick frames or build pedestals, take three simple steps: measure your space, pick a focal point, and decide how viewers will move through the display. These choices determine scale, sightlines, and how many items you can show without crowding. A clear plan saves time and keeps the final result cohesive.
Sketch a quick floor plan or take photos and mark potential display areas with painter’s tape. Try different arrangements digitally or with cardboard mock-ups to preview balance and spacing. Doing this avoids last-minute changes that make displays look hurried or haphazard.
Set goals that match your audience and context: are you selling at a fair, decorating a living room, or showing work online? Each scenario needs different priorities—durability and accessibility at markets, aesthetic cohesion for home displays, and clarity of image for digital galleries. Align your materials and lighting choices with those goals.
Gallery walls: arranging two-dimensional crafts
Gallery walls are ideal for paintings, prints, stitched pieces, or ceramic plates that can hang. The trick is rhythm: varying frame sizes, maintaining consistent spacing, and introducing negative space to let eyes rest. A well-planned wall reads like a single composition rather than a random collection.
Start by grouping pieces into clusters of three to five, aiming for a central anchor piece and supporting works around it. Keep frames consistent if you want a minimalist look, or mix textures and colors for a bohemian feel. Lay everything on the floor first to experiment.
Use templates made from kraft paper to trace frame sizes and tape them to the wall at potential spots. This low-effort rehearsal helps you visualize the final arrangement without making holes in drywall. It’s a small habit that saves time and reduces stress when installing a large display.
Mix frames and negative space
Contrast ornate frames with simple ones and sprinkle open spaces between clusters to avoid visual clutter. Negative space functions like a breath between pieces and magnifies the impact of each item. Too many tightly-packed frames flatten the composition and make the wall feel heavy.
Try aligning either the center of frames or their bottoms for a cleaner look; inconsistent alignment can appear accidental. If you want a dynamic, casual effect, stagger pieces but keep at least a few visual anchors so the eye knows where to settle. The goal is deliberate balance rather than accidental chaos.
When hanging textiles or stitched works, consider mounting them on simple canvases or using hidden clips to preserve fabric drape. Textiles benefit from breathing room so texture and stitch detail can be appreciated. Proper mounting also prevents sagging over time and elevates their perceived value.
Create a theme or color story
Unifying a gallery with a theme—palette, subject, or technique—creates a stronger narrative than showing an eclectic mix. A color story ties disparate pieces together and helps buyers or guests understand your aesthetic. Themes also make it easier to edit: if something doesn’t fit, it probably doesn’t belong on that wall.
Choose between monochrome cohesion or complementary contrasts; either can be powerful when done intentionally. A monochrome wall feels calm and curated, while pops of complementary color can energize a space. Match your frames or mats to the dominant tone to reinforce unity.
For artists who produce different series, rotate works seasonally to keep the wall fresh and give each series its moment. I rotate mine quarterly, focusing on lighter, airier pieces in spring and richer, textured works in fall. Rotations renew interest and send a subtle signal that your collection is living, not static.
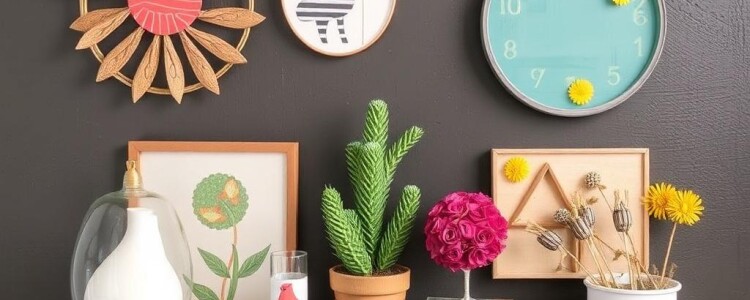
Shelves, ledges, and shadow boxes for three-dimensional work
Shelves and ledges are forgiving choices for three-dimensional crafts—pottery, sculptures, woven baskets—because they allow easy rearrangement and depth. Floating shelves provide a clean, contemporary look while vintage ledges and plate racks add warmth. Choose shelf depth based on the largest piece you plan to display.
Shadow boxes are excellent for delicate or narrative objects: miniature scenes, heirloom textiles, or detailed jewelry. They protect pieces from dust and handling while creating a contained visual story. Consider custom foam inserts or archival backing to keep fragile items secure.
Arrange objects in odd-numbered groupings and varying heights to create interest; a trio with a taller central piece often reads well. Use small risers or stacks of books to change elevations without purchasing specialty hardware. This layered approach draws attention and helps each object find its own space.
Layering and depth techniques
Layering gives three-dimensional displays vitality—place a low object in front of a taller backdrop piece to create a sense of depth. Use translucent materials like acrylic risers to make height changes feel light. Avoid flattening everything onto a single plane, which can reduce sculptural pieces to tabletop props.
Experiment with diagonals and off-center placements to make arrangements feel dynamic. A slightly angled piece can suggest movement and keep the display from feeling too static. Keep sightlines in mind so tall items don’t block smaller ones behind them.
Integrate small, directional lighting within shelving to accent textures and cast soft shadows. LED puck lights and strip lights are low-heat options that highlight ceramics, glass, and textiles without risking damage. Thoughtful shadows add drama and reveal three-dimensional qualities.
Build custom shadow boxes
Making a shadow box is an approachable woodworking project and allows you to tailor depth, finish, and mounting to each project. Use poplar or pine for easy cutting and glue mitered corners for a clean look. Add a hinged back or magnetic closure for easy access and occasional rotation of contents.
For delicate fabrics or paper, use acid-free backing and UV-filtering acrylic to prevent fading. A removable foam insert with cutouts can cradle fragile shapes and make them appear to float. Small details like hidden hanging hardware and recessed frames lend professionalism to homemade displays.
If you prefer not to build, thrift stores often yield vintage shadow boxes that only need a fresh coat of paint. I once painted an old curio box matte black, added linen backing, and used it to stage a small ceramic series; the transformation was immediate and inexpensive. Creativity often finds a path in repurposing.
Pedestals, risers, and IKEA hacks

Pedestals elevate single pieces and give them a gallery presence that encourages viewing from all angles. You don’t need custom pedestals; stacked crates, upside-down stools, or painted amplifiers serve the same purpose with personality. Choose finishes that complement the artwork rather than compete.
IKEA is a goldmine for display hacks: use spice racks as miniature shelving, turn a Kallax cube on its side for a low pedestal, or stack Bekvam spice shelves for tiered risers. Paint or wrap solutions in decorative paper to match your aesthetic and make them feel intentional. Practicality and style need not be separate.
Acrylic risers are invisible stage managers: they lift items without drawing attention, perfect for small ceramics or jewelry. For heavier pieces, reinforce risers with plywood supports underneath. Stability is critical at craft fairs where bumps and crowds increase the risk of accidents.
Use everyday objects for unexpected displays
Household items often become the most memorable displays: ladders hung horizontally for hanging baskets, vintage suitcases stacked as pedestals, or window frames repurposed into wall grids. Using familiar objects creates a sense of warmth and can tell a backstory about your style. Thrift and salvage shops are great sources for these pieces.
Tension rods in bookcases make great spots to drape small tapestries or scarves without puncturing walls. Wooden cutting boards with easel backs serve as rustic plates stands for hand-painted platters. Thinking in terms of function-first reveals countless display possibilities hiding in plain sight.
At one market, I used an old garden cart to showcase planters and terrariums; the mobile display allowed me to reorient pieces for different lighting throughout the day. That small decision turned the booth into a moving vignette and attracted customers who appreciated the quirky presentation. Unexpected platforms draw attention.
Lighting makes things sing

Light reveals color, texture, and form. Natural light is lovely but unreliable; supplement it with warm, directional LED lights to control highlights and shadows. Avoid harsh overhead fluorescents that flatten textures and wash out colors—soft side lighting enhances dimensional pieces beautifully.
Use small clip lights for markets and track lighting for permanent displays, and always consider color temperature: 2700–3000K is warm and inviting, while 3500–4000K reads more neutral and modern. Dimmable lamps give flexibility and prevent glare on glossy surfaces like glaze or varnish. Lighting is not an afterthought.
Experiment with accent lighting to create quiet focal points; a single well-placed LED can turn a modest piece into the star of the show. Remember that lighting affects mood: soft pools of light suggest intimacy, while brighter spreads communicate clarity and utility. Choose illumination that amplifies your intention.
Textured backdrops and fabric panels

Backgrounds matter as much as frames. Wood, concrete, linen, and painted canvases each evoke different styles and help the viewer interpret the work. For example, a handwoven textile looks at home against raw wood, while delicate paper art benefits from a clean, neutral linen backing.
Use removable fabric panels when you need portability or seasonal switches. Velcro or magnetic systems allow quick changes between shows or holiday displays. Panels also soften sound in busy market booths and create a comfortable viewing environment.
Don’t forget scale when choosing texture: large, bold backdrops can overpower small pieces, while subtle textures might get lost behind oversized sculptures. Match the backdrop texture to the scale and emotional tone of your work to reinforce your message without stealing the spotlight.
Seasonal and rotating displays
Rotating pieces keeps viewers returning and lets you spotlight different techniques or collections over time. Change displays seasonally to reflect color palettes, materials, or appropriate gift-giving moments. This practice not only refreshes interest but also helps with inventory management.
Create a rotation schedule—quarterly is manageable for most makers—and prepare transportable mounts for easy swaps. Labeling and cataloguing pieces before rotation helps maintain records of what sold or what drew interest. A simple spreadsheet and clear tags make transitions smoother.
Seasonal displays are especially effective in retail environments: summer ceramics near plants, cozy knitwear in autumn, and bright prints for spring. I plan seasonal themes months ahead, which lets me produce series that align with display cycles and holiday timelines. Planning reduces last-minute stress and increases cohesion.
Labels, stories, and the thoughtful small details
Small touches—handwritten tags, material lists, or a short story—transform a purchase into an experience. People buy stories as much as objects; a label that explains inspiration, technique, or care creates connection and justifies value. Keep labels concise but evocative; let them hint rather than exhaust the narrative.
Include practical details like size, materials, and price on unobtrusive cards adjacent to items. For fragile or wearable pieces, add care instructions and suggested uses. Clear information reduces hesitation and increases buyer confidence, particularly at fairs where shoppers decide quickly.
Consider a signature element across all labels (a stamp, a logo, or a consistent font) to build brand recognition. I use a small embossed tag with my initials on each piece and matching labels; it ties my table together and has become a recognizable detail customers comment on. Consistency breeds professionalism.
Digital displays: photographing and sharing work online
How you photograph your work determines how it appears online; a great real-world display can fall flat without thoughtful digital staging. Use consistent backgrounds, flattering light, and multiple angles to communicate scale and texture. Include lifestyle shots that show the piece in use so buyers can imagine it in their homes.
Natural window light and a neutral bounce card can produce beautiful results without fancy gear. For glossy items, angle the camera to avoid reflections. When posting to social media or an online shop, crop images consistently and write descriptive captions that include size and materials.
Consider short video clips or 360-degree spins for three-dimensional work; movement reveals depth and helps buyers understand proportions. I often post a quick clip of a ceramic mug being turned under soft light—viewers linger longer and comment more when they can see the piece rotate. Video invites inspection.
Displaying at craft fairs and pop-ups
At markets, visibility and accessibility trump perfection. Design your booth to catch the eye from a distance and provide clear paths for customers to enter and browse. Keep bestsellers near the front and reserve a centerpiece that anchors the booth visually.
Use consistent heights and groupings to create a sense of abundance without chaos. Price items clearly and keep small impulse buys near checkout. Bring extra hooks, tape, and a step ladder for last-minute fixes—you’ll be grateful when unforeseen needs arise.
Engage visitors with tactile opportunities: allow gentle touch where appropriate and have examples of use on display. Demonstrations draw crowds; when feasible, show a quick process or explanation of technique. Personal interaction often seals sales more effectively than any signage.
Kid-friendly displays and preserving memories
Children’s crafts are precious and deserve display methods that celebrate effort while remaining safe and changeable. Create a rotating “gallery” at kid-eye level with cork strips, magnetic boards, or clip rails to showcase current favorites. These systems make it simple to swap artworks without fuss.
For long-term preservation, photograph each piece before cycling it out and store originals in labeled portfolios or flat archival boxes. A digital archive becomes a sentimental time capsule and enables you to print photo books later. Families often treasure a curated digital record more than piles of papers.
Get children involved in the display process—let them choose frames or mats and explain why their work is special. Their ownership adds confidence and makes the display more meaningful. At home, create a designated craft wall that celebrates process as much as product.
Storage that doubles as display
Combine storage and display with open shelving, glass-front cabinets, or modular cubes that keep items accessible while presenting them attractively. This approach works well for makers who need quick access to tools and want finished goods to inspire ongoing creativity. Visibility also helps with inventory awareness.
Use labeled bins for small parts and clear containers for repeatable visual order. Rotate out displayed items and replenish from reserved stock to maintain a fresh look. Efficient storage systems prevent clutter and let your display breathe, which improves overall perception.
Consider furniture with built-in display potential: sideboards with glass doors, vintage apothecary cabinets, or bookcases with adjustable shelves. These pieces present work in a domestic context, helping potential buyers envision how handcrafted items might live in their own homes.
Maintenance, safety, and longevity
Ongoing care preserves both appearance and value. Dust pieces gently, check mounts and wiring periodically, and replace brittle fasteners before they fail. Preventive maintenance keeps displays looking intentional and protects your reputation as a careful maker.
Consider the risks of materials: certain glues and trims discolor in sunlight, and metals can tarnish if exposed to moisture. Use archival-safe materials for valuable pieces and include handling instructions on labels. Small protective measures now avoid costly restorations later.
If you display glass or ceramic near edges, secure them with museum putty or discreet adhesive pads. In high-traffic venues or homes with pets and children, create buffer zones or enclosures. Safety and aesthetics can coexist with thoughtful planning.
Budget-friendly ideas and sustainable choices
Creative displays don’t require a big budget; thrift stores, discarded pallets, and free online marketplaces offer rich materials for staging. Paint and hardware transform inexpensive finds into cohesive display furniture. Sustainability and thriftiness often go hand-in-hand with interesting aesthetic choices.
Upcycle crates, glass jars, and sheets of plywood into display elements with a little sanding and varnish. Repurpose cardboard for temporary gallery walls during pop-ups. Being resourceful can become part of your brand story, appealing to eco-conscious customers.
Invest in a few multipurpose pieces—portable lighting, a good display table, and reusable backing panels—that can be adapted for many shows and spaces. Splurge selectively on items that improve longevity and versatility; these purchases pay off over multiple displays and seasons.
Bringing your work into the world
Display is the bridge between making and appreciation; thoughtful presentation amplifies your voice, protects your work, and creates moments of connection. Whether you’re staging a home gallery, a market booth, or an online shop, intentional choices in layout, lighting, and labeling will raise the impact of every piece. Treat display as creative play—an opportunity to extend your craft into how others experience it.
Start small: pick one area to refresh and try a new arrangement, lighting tweak, or repurposed prop. Observe how people react and keep what works. Over time, these small experiments become a refined display language that communicates your values and invites viewers into your creative world.
Your finished crafts deserve to be seen in the best light. With planning, a few thoughtful materials, and some willingness to experiment, you can create displays that tell stories, protect objects, and spark curiosity—turning each showing into its own little celebration of craft.


