Picking up a frame loom feels a bit like finding a new language under your fingertips. Threads cross and pull, colors converse, and a simple rectangle of wood or metal becomes a place to experiment, build muscle memory, and make small, useful objects.
This article walks you through the basics, from tools and setup to simple structures and finishing techniques. Read straight through or jump to the section you need—either way, you’ll come away with practical steps and a few tricks I use when teaching first-timers.
What a frame loom is and why it’s a great starting point
A frame loom is the simplest kind of loom: a rigid rectangular structure with warp threads stretched between two opposite sides. Its openness and portability make it ideal for beginners; you can weave small samples in an afternoon and scale up to larger projects later.
Unlike floor looms or table looms, a frame loom has no moving parts or heddles to learn, so the focus stays on rhythm, tension, and basic interlacing patterns. That simplicity also encourages creative play—textures, fringe, and mixed materials are easier to try without being intimidated by complex mechanics.
Types and sizes of frame looms
Frame looms come in many forms: simple wooden frames, pre-made commercial kits, circular and lap looms, and even DIY versions made from picture frames. Size affects both the type of project you can make and the tension you can hold; choose a size that suits your workspace and goals.
Smaller looms—8 to 12 inches wide—are great for practice swatches, coasters, and small wall hangings. Larger frames, 18 to 36 inches or more, allow for scarves and larger tapestries but require more attention to even tension across the warp.
Tools and materials you’ll need
You can get started with a handful of inexpensive supplies: a frame loom, yarn or fiber for warp and weft, a shuttle or beater, and a pair of scissors. Many beginners find an inexpensive tapestry needle, a pick-up stick, and a comb or fork for beating very helpful.
Here’s a short list of essentials and nice-to-haves to help plan your first shopping trip or supply drawer.
- Frame loom (wooden or metal)
- Warp yarn (strong, smooth yarn like cotton or linen warp)
- Weft yarns (varied textures and colors)
- Shuttle or stick for winding yarn
- Tapestry needle or large-eyed needle
- Comb, fork, or beater for compacting weft
- Scissors and measuring tape
Quality matters, especially for the warp: choose a yarn that won’t stretch or break under tension. I often recommend cotton or strong acrylic for first projects because they’re forgiving and inexpensive.
Choosing warp and weft: fibers and weights
Warp and weft serve different roles: the warp is the held, load-bearing structure, while the weft is the thread you weave through it to build cloth. Match the warp material to the demands of the piece—strong and low-stretch for long-term use, softer yarns for purely decorative hangings.
Weft yarns are where you’ll get playful with texture and color. Bulky yarn creates a chunky, sculptural surface, while finer yarns give a tighter, smoother fabric. Don’t be afraid to combine weights; mixing a thin warp with a bulky weft can produce enticing texture and depth.
Fiber comparison table
The table below gives a quick comparison of common fiber choices for warp and weft. It’s a practical way to choose materials based on durability, ease of use, and texture.
| Fiber | Best for | Pros | Cons |
|---|---|---|---|
| Cotton | Warp, durable weft | Strong, low stretch, economical | Can feel stiff; limited elasticity |
| Linen | Warp, fine projects | Very strong, smooth | More expensive, less forgiving |
| Wool | Weft, textured hangings | Springy, warm, great for rya | Can be bulky; felting risk |
| Acrylic/Blends | Weft and warp for practice | Affordable, wide color range | Less breathable; variable quality |
Use this table as a starting point, not a strict rulebook. Personal taste, budget, and the intended use of the finished item all influence the best choices.
Setting up the loom: planning and measurements
Good planning saves frustration. Decide the finished width and length of your project, then add extra for warp waste and hems—typically a few inches at each end. Measure carefully and account for how tightly you’ll pull your warp; tighter tension shortens usable warp length slightly.
Sketch a basic plan for your piece, including color bands, textured areas, or specialty details like rya knots. A plan does not have to be rigid; it’s simply a guide so you don’t run out of yarn mid-project or misjudge proportions.
Measuring warp length
To measure warp length, calculate desired finished length and add for loom waste and fringe. A general rule is to add 6–8 inches at each end for selvedge, and additional length if you plan to hem or bind the ends.
If you’re new, err on the side of extra length—cutting warp too short is harder to fix than trimming a little extra later. Keep a note of measurements on your project card so you can replicate successful sizes and avoid repeating mistakes.
Warping the frame: step-by-step
Warping a frame loom is a rhythmic and oddly satisfying task. You’ll bring the warp yarn back and forth across the frame, keeping an even spacing and consistent tension, creating parallel lines that become the backbone of your weaving.
Follow these steps to warp a simple frame loom, then practice until spacing and tension feel comfortable:
- Secure the tail of your warp yarn at one corner with a knot or tape.
- Wrap the yarn across to the opposite side, keeping the slack light and even.
- Continue back and forth until the required number of warp threads are in place.
- Tie off the tail and evenly distribute the threads, adjusting tension as needed.
Take your time with this. I’ve taught groups where the warping took longer than the weaving, and that’s okay—the warp sets the tone for everything that follows. If you get uneven spacing, slide threads along the frame gently with your fingers until they’re regular.
Creating a shed and managing tension

In more complex looms, a shed is formed by raising alternate warp threads. On a frame loom you make a shed manually by lifting and separating warps or using a stick or shed rod. This separation lets you run the weft yarn cleanly across without catching unwanted threads.
Tension is the silent teacher of weaving; too loose and your structure will sag, too tight and the frame will bow or threads may snap. Aim for firm but flexible tension—you should be able to depress a warp thread slightly with a fingertip but not easily push it all the way through.
Using a shed stick or pick-up stick
A shed stick or pick-up stick simplifies the process: slide it between alternating warp threads to create a temporary shed. This speeds weaving and lets you create tidy, even rows without constantly lifting individual threads.
Pick-up sticks also help with patterning: swapping sticks or changing which threads they pick up can produce simple geometric designs. Keep one or two sticks handy when experimenting with patterns and textures; they’re inexpensive and extend what you can do.
Basic weaving techniques for beginners
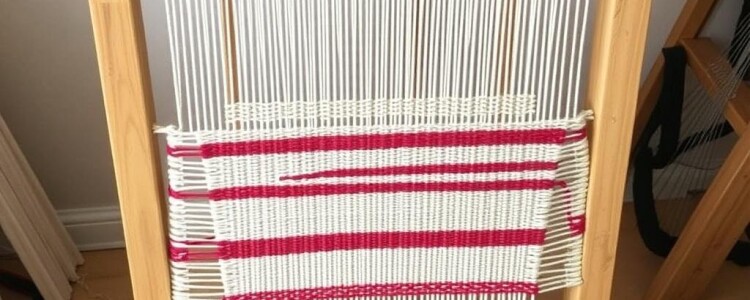
The most fundamental pattern is plain weave—over one warp, under the next—repeated row after row. Plain weave teaches rhythm and gives immediate gratification: after a few passes the fabric starts to appear and the sense of progress becomes motivating.
From there you can add texture with a few straightforward techniques: soumak for braided cord-like effects, rya knots for fringes and pile, and supplementary weft for raised motifs. Each requires only small tweaks to the basic process and yields big visual impact.
Plain weave and beating
To execute plain weave, pass your weft across the shed and then change the shed so the weft alternates going over and under adjacent warps each row. After each pass, use a comb or your fingers to beat the weft down, compacting the rows and controlling the fabric density.
Beating rhythm is a tactile skill. Too forceful a beat will bunch the weft and narrow the piece; too light a beat leaves gaps and a loose feel. I recommend practicing on a small swatch to find a beating pressure that keeps the fabric even but not compressed.
Soumak and wrapping techniques
Soumak is a wrapping technique that creates a raised, braided effect across the warp. Wrap the weft yarn around a small group of warps in a figure-eight pattern, moving across to build a textured band. It’s excellent for creating visual interest without changing the warp.
Because soumak sits on top of the warp, it’s forgiving and works well with thicker yarns. Use it for borders, stripes, or as a decorative band in the middle of a plain-weave field.
Rya knots and fringes
Rya knots introduce pile to a flat weave and are how traditional Scandinavian rugs get their shag. Fold a length of yarn in half, loop it around two adjacent warps, and pull the ends through the fold to form a secure knot. Repeat across a row for a fringe or partial pile area.
Vary the lengths and density of the knots to build sculptural effects, and trim to shape once complete. Rya is wonderfully forgiving for beginners who enjoy tactile results quickly.
Design basics: planning color and pattern
Design in weaving blends practical planning and intuitive play. Simple stripes are a reliable way to practice color changes and tension control, while geometric shapes or pictorial work require more thoughtful warping and careful color changes.
Using graph paper to map out color blocks or stitch counts helps, especially for repeatable patterns. For wall hangings I often sketch rough color zones on a small piece of paper and leave room to improvise as the piece develops.
Color choices and contrast
Choose colors that provide clear contrast in value as well as hue. High-contrast combinations make patterns pop, while low-contrast palettes create subtle, blended looks. Consider using a single bright accent color against neutral fields to draw the eye.
Texture affects perceived color: a bulbous, fuzzy yarn will reflect light differently than smooth cotton, changing how the color reads in the finished piece. Try small swatches when mixing fiber types to see the interaction in person.
Graphing and planning patterns
For repeatable patterns, transfer your idea to graph paper where each square corresponds to a warp space. Mark where you’ll use specific colors and textures so you can bring the plan to the loom with fewer interruptions.
Even with a plan, leave space for serendipity. Many of my best pieces began as a simple stripe plan that took a sharp left turn three rows in; weaving rewards a balance between intention and improvisation.
Finishing techniques: hemstitching, binding, and trimming
Finishing transforms a raw loom piece into a polished object. Hemstitching secures both ends and creates a neat transition to fringe or braid. Binding or sewing the ends stabilizes warp threads and prevents unraveling over time.
After you remove the piece from the loom, secure the ends immediately. Use a needle or crochet hook to tie off groups of warp threads in small knots or to stitch a hem that can be ironed or blocked flat.
Removing the piece from the loom
Cut the warp at each end and tie small groups together to preserve tension and keep the weave intact. Work methodically across the width so fringe or edge braids remain even and balanced.
For more polished edges, create a hem by folding the top and bottom edges back and stitching through the folded section to trap the warp ends. This adds weight and stability to scarves and functional items.
Blocking and pressing woven pieces
Some fibers benefit from light blocking to settle the weave. Wet-blocking wool rug samples will encourage fibers to relax and even out, while cotton may need careful steam blocking to avoid distortion. Always test a small swatch first.
Pressing is not typical for chunky textured hangings, but flat items like scarves or placemats will look more professional after gentle steaming and shaping. Use a pressing cloth and cautious heat settings for synthetic fibers.
Common problems and how to fix them
Beginners often encounter uneven selvedges, loose warp threads, or gaps in the weft. The good news: most issues are fixable with a few adjustments and a bit of patience. Troubleshooting is part of learning—each problem teaches a better practice for the next piece.
Below are common issues and practical fixes I use in workshops and at home.
Loose edges and gaps
Loose edges often come from inconsistent tension or letting the weft float too far into the outer warp spaces. Tighten edge tension by gently nudging outer warp threads inward and using a tapestry needle to tuck the weft closer to the selvedge.
For persistent gaps, add a row of soumak or a thin overcast stitch along the edge to lock the weft in place. This stabilizes the side and improves appearance without reworking the entire piece.
Puckering and tight areas
Puckering results from over-beating or using weft yarns that are too large relative to the warp spacing. If the fabric puckers, ease up on your beating pressure or switch to a thinner weft for subsequent rows.
For sections that have already puckered, you can sometimes relax the fabric with steam or wet-blocking, then gently pull the rows to even tension while it dries. Prevention by monitoring beat pressure is the best approach.
Warp breakage and snapping
Warp threads break when under too much tension or when the yarn quality is poor. If a warp snaps mid-project, tie a small, secure knot and continue; later you can stitch or braid that area to strengthen it. Replace the warp if multiple breaks occur.
To avoid breaks, knot the warp ends with a buffer of scrap yarn at each corner and don’t over-tighten during setup. Choosing a strong warp yarn from the start reduces the risk significantly.
Simple projects to practice and build confidence
Start small: coasters, bookmarks, and simple wall hangings teach core skills quickly. Each small project offers a chance to practice warping, maintain even tension, and try one or two decorative techniques without a large time investment.
Once comfortable, scale to scarves, placemats, or lap rugs. Planning slightly larger projects forces you to manage consistent tension over a wider span and to think about finishing techniques more carefully.
Beginner project ideas
- Coasters: 6–8 inch warp, plain weave with color stripes
- Bookmark: narrow warp, soumak edge, tassel finish
- Small wall hanging: 12–18 inch warp, mixed textures and rya knots
- Scarf: longer warp, consistent weaving, finished with a tidy hem
These projects are great for giving you a sense of completion and a portfolio of skills to build on. I recommend making one piece for function and one purely experimental piece per month when learning.
Care and maintenance for your woven items
Care instructions depend on fiber content. Wool items usually need gentle handwashing and flat drying, while acrylic and cotton can often tolerate machine washing on a gentle cycle. Always test a small sample wash first if you are unsure about the fiber blend.
Store woven pieces flat or rolled to avoid creases, especially those with three-dimensional texture. Avoid hanging heavy woven rugs or densely knotted items on a single nail; distribute weight across a rod or use proper hanging hardware.
Where to learn more and find community
Local fiber guilds, craft supply stores, and community colleges often offer hands-on classes where you can get immediate feedback. Online resources like video tutorials and weaving forums are also helpful for troubleshooting and inspiration.
Joining a community helps accelerate learning: other weavers share project ideas, leftover yarn, and solutions to common problems. I’ve found that a short conversation with another weaver can save hours of trial and error.
Recommended books and online resources
Look for beginner-friendly books on tapestry weaving and small-loom techniques, and follow a few skilled weavers on social platforms for daily inspiration. Many experienced artisans post step-by-step photos and short videos that answer specific how-to questions quicker than a long manual.
When choosing tutorials, prioritize those that show hands-on close-up work and clear explanations of tension, shed formation, and finishing. Written patterns are useful, but images and video often make setup and technique clearer for beginners.
My personal tips from teaching beginners

When I teach a first weaving class, I emphasize rhythm over speed. Consistent, relaxed motions produce better results than hurried, forceful rows. Encourage students to breathe through the process; weaving quickly becomes a meditative practice when the movements are steady and deliberate.
I also suggest keeping a weaving notebook. Note yarn types, warp lengths, beating pressure observations, and any modifications you made mid-project. These short notes save you from repeating mistakes and help replicate what worked well.
Keeping creativity alive as you progress

After you master the basics, treat rules as friendly suggestions rather than iron laws. Try unconventional materials—ribbon, strips of fabric, leather—and explore how they change texture and drape. Innovation often arrives by combining standard weaving with unexpected elements.
Experiment with scale as well: small, intricate pieces teach control, while large, bold hangings teach how to manage consistent tension and design balance. Both kinds of practice make you a more confident and versatile weaver.
Weaving on a frame loom is a hands-on craft that rewards patience, curiosity, and a willingness to tinker. With a modest set of tools and a few evenings of practice, you can produce functional textiles and decorative art that carry a personal touch. Keep a small stash of samples, build a library of favorite yarns, and let each piece teach you something new as you grow your skills and creative voice.


