There’s a particular kind of pleasure in turning pantry staples into something luxurious and useful. Whether you crave a fizzy, aromatic evening soak or a smooth, creamy bar of soap made to your specifications, making bath bombs and soaps is a craft that rewards patience, curiosity, and a bit of playful chemistry.
In this guide I’ll walk you through materials, methods, safety, and creative variations so you can go from tentative beginner to confident maker. Expect step-by-step recipes, troubleshooting tips, and real-world advice I learned from dozens of weekend experiments and a small neighborhood market stall I ran for a season.
Why make your own bath bombs and soaps?
Store-bought bath and body products are convenient, but they can hide perfumes, preservatives, and fillers you wouldn’t choose intentionally. Making your own puts you in control of every ingredient and lets you tailor products to sensitive skin, scent preferences, and sustainability goals.
Cost is another factor: once you buy core supplies in bulk, each bath bomb or bar becomes far cheaper than comparable artisanal products. You’ll also gain creative freedom—custom colors, layered designs, and signature scent blends that speak to your taste.
Beyond economics and ingredient transparency, the process itself is therapeutic. Measuring, mixing, and molding is tactile and grounding; sharing handmade gifts builds connection. If you sell, you’ll learn product development, labeling, and small-scale marketing along the way.
Basic chemistry and safety: what you need to know
Bath bombs are an acid-base reaction: baking soda (a base) combines with citric acid and a little moisture in the water to produce carbon dioxide bubbles. Controlling moisture and timing gives you a solid, properly fizzing bomb rather than a prematurely activated crumbly mess.
Soapmaking, especially cold process soap, involves saponification—the reaction of a lye (sodium hydroxide) solution with fats or oils to form soap and glycerin. Lye is a hazardous chemical that requires respect: proper safety gear, accurate measuring, and dedicated tools that you don’t use for food.
Safety practices are simple to follow but nonnegotiable. Work in a ventilated area, wear goggles, gloves, and long sleeves when handling lye, and keep a first-aid plan for splashes or spills. For bath bombs and melt-and-pour soaps, risks are minimal; for cold process, double-check your temperature and measurements every time.
Essential ingredients for bath bombs
Bath bombs need a few reliable ingredients: baking soda (sodium bicarbonate), citric acid, a binding oil (like coconut or sweet almond), a liquid (witch hazel or water), and optional extras such as essential oils, colorants, and additives like Epsom salts or clay.
Choose citric acid intended for cosmetic or food use—cosmetic-grade will have fewer impurities. Baking soda should be fine-textured and dry; older or damp baking soda can cause underwhelming fizz. Oils add moisturizing properties; lightweight oils like sweet almond or fractionated coconut keep bombs from feeling greasy.
Liquid choices influence texture and shelf life. Witch hazel in a spray bottle is a common binder because it’s less likely to trigger the acid-base reaction prematurely compared with plain water. If you use water, spray in very small amounts while mixing quickly and evenly.
Ingredient swaps and common additives for bath bombs
Below is a compact table of common bath bomb ingredients, why they’re used, and simple alternatives. This can help when you want a specific property—more fizz, longer shelf life, or gentler skin contact.
| Ingredient | Purpose | Alternatives |
|---|---|---|
| Baking soda | Primary base for fizz | Arm & Hammer is fine; avoid substitutes—needed for reaction |
| Citric acid | Acid to trigger fizz | Vinegar is not suitable; use food/cosmetic-grade citric acid |
| Cornstarch | Binder and texture softener | Arrowroot for a natural option |
| Clays (kaolin, French green) | Color and skin benefits | Use mica powders sparingly for shimmer |
| Oils (coconut, almond) | Moisturizing and binding | Jojoba or fractionated coconut for non-greasy feel |
| Liquid (water/witch hazel) | Activates binder | Rubbing alcohol is used in a spray to reduce premature fizzing |
Essential ingredients for soap: melt-and-pour vs. cold process
There are two popular ways to make soap at home: melt-and-pour (M&P) and cold process (CP). M&P is accessible—buy a pre-made glycerin block, melt it, add color and fragrance, and pour into molds. CP uses raw oils and lye and requires more skill but offers deeper customization.
For M&P, look for a high-quality soap base labeled for cosmetic use; clear, white, and goat’s milk bases have different aesthetics and skin-feel. For CP, common oils include olive oil, coconut oil, and palm oil (or sustainable palm alternatives). Each oil brings different hardness, lather, and conditioning qualities.
Accurate measuring for CP is essential: lye calculators determine the exact amount of sodium hydroxide and water for your chosen oil blend. Never estimate. Keep records of recipes and batch numbers so you can replicate successful bars or adjust formulations if a batch needs improvement.
Common soap oils and their properties
Choosing oils is the heart of soap formulation. Below is a simple table summarizing common oils and what they bring to a bar so you can mix and match for texture, lather, and moisturizing feel.
| Oil | Property in soap | Typical usage |
|---|---|---|
| Olive oil | Mild, conditioning, low lather | 40–60% in gentle bars |
| Coconut oil | Hard bar, strong cleansing, high lather | 10–30%, lowers to 20% or less for sensitive skin |
| Palm oil (sustainable) | Hardness and stable lather | 10–30%, use RSPO-certified where possible |
| Shea or cocoa butter | Luxurious, conditioning, increases hardness | 5–15% as a specialty butter |
| Castor oil | Boosts lather and creaminess | 3–5% as a lather booster |
Tools and workspace: what you really need
You don’t need an industrial setup to start—just a clean, uncluttered corner in your kitchen or garage. For bath bombs, a mixing bowl, whisk, silicone molds or metal molds, a spray bottle, and measuring cups are enough. For soap, add a digital scale, thermometer, stick blender (for CP), and lye-safe containers.
Designate tools for soapmaking only; never reuse food utensils that have touched lye. Use glass, stainless steel, or heavy-duty plastic for lye solutions. Keep a dedicated towel or paper towels for spills and an empty bucket or tray to set molds on so you can move multiple batches easily.
Organization reduces mistakes. Label containers, keep a notebook for recipes and adjustments, and arrange frequently used supplies within arm’s reach. Good lighting and a timer help when you’re tracking trace times and pour windows.
Bath bomb recipe: basic fizzing bomb step by step
This tried-and-true recipe creates a balanced bath bomb with good fizz and a gentle skin feel. Make a small test batch first to get a feel for moisture—too wet and the mixture will fizz early; too dry and it will crumble.
Ingredients (makes 6–8 medium bombs): 1 cup baking soda, 1/2 cup citric acid, 1/2 cup cornstarch, 1/2 cup Epsom salt, 2 1/2 teaspoons oil (sweet almond or fractionated coconut), 2 teaspoons water or witch hazel (in a spray bottle), 10–15 drops essential oil, coloring as desired.
Method: Combine the dry ingredients in a large bowl, whisking to remove clumps and aerate the mix. In a separate small bowl, whisk the oil, essential oil, and coloring. Add the wet to the dry a few drops at a time, mixing thoroughly with your hands or a spoon. When the texture holds together when squeezed, it’s ready for molds.
Pack the mixture into molds firmly and let them dry for 24–48 hours on a flat surface. Unmold gently and cure for another 24 hours if needed before packaging. Store in an airtight container away from humidity to preserve fizz.
Helpful tips for consistent bath bombs
Humidity is your enemy—work in a dry room or use a dehumidifier on damp days. If the mixture feels too sticky, add a teaspoon of dry ingredients at a time until the right consistency returns. If it’s too crumbly, mist lightly with witch hazel and rework quickly.
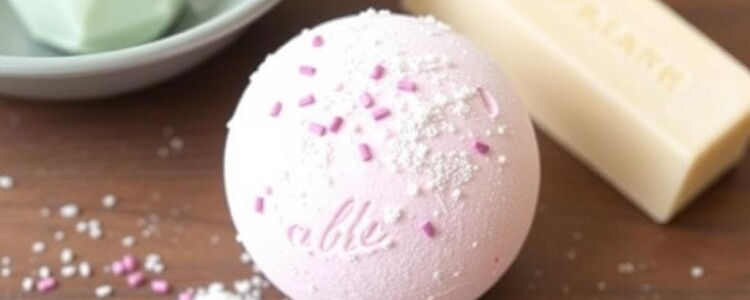
When using pigments, less is more; mica powders and cosmetic dyes give vivid color without bleeding. For layered or marbled bombs, divide your base mix and tint each portion separately, then layer or swirl in the molds for dramatic results.
Creative bath bomb variations and embeds
Once you’ve mastered a basic bomb, you can experiment with variations: moisturizing bombs with cocoa butter, color-changing bombs that reveal hidden layers, or bath melts that combine a bath bomb’s fizz with solid oils for a luxurious oil slick. Additives like dried petals or a small soap embed make presentation special.
Be cautious with flower petals or botanicals: coarse material can shed into drains and some botanicals stain or can host bacteria if left wet in a jar. Use finely crushed herbs or add them to the center as a small embed rather than mixing throughout if you plan to store bombs long-term.
If you want a softer, skin-nourishing experience, increase your oil or butter content slightly, but know this can reduce fizz. Balancing aesthetics and function is part of the craft: sometimes you’ll choose a spectacular presentation; other times, maximum fizz.
Safety and skin considerations for fragrances and colorants
Essential oils are natural but potent; some, like cinnamon or clove, can irritate skin and should be used sparingly or avoided for bath products. Fragrance oils designed for cosmetics offer stable, predictable scents but vary in skin sensitivity—choose reputable suppliers and check IFRA guidelines if you sell commercially.
For colorants, cosmetic-grade micas and iron oxides are generally safe. Avoid food coloring for soaps and bombs if you want long-lasting vibrancy and to prevent streaks or bleeding. Patch-test new formulations on a small skin area before gifting or selling.
Label anything you gift or sell with a simple ingredient list and allergen warnings (tree nut oils, for example). This transparency helps recipients avoid reactions and builds trust if you’re selling your creations.
Melt-and-pour soap: a friendly starting point
Melt-and-pour soap is forgiving and fast—perfect for gift-making, parties, or testing fragrances and color combos. Cut your soap base into chunks, melt gently in a double boiler or microwave in short bursts, stir in additives, and pour into molds. Soap will set in 30 minutes to an hour depending on size.
Additives like oats, honey, and exfoliants should be chosen based on their effect on the soap’s structure and shelf life. For instance, honey can increase the soap’s heat and darken it; crystallized additives may need pre-soaking. Use a small test pour when trying unusual combinations.
Embedding shaped soaps is an attractive option: pour a thin layer, set partially, add embeds, then top off with more melted base. This creates visual depth and a boutique look without the complexity of cold process swirls.
Cold process soap: a careful, rewarding craft

Cold process soapmaking offers unparalleled customization—control the oils, superfat level, and additives for a bar that feels exactly how you want. The trade-off is handling lye and waiting for the bar to cure for 4–6 weeks to reach mildness and hardness.
Basic CP steps: measure oils and melt as needed, prepare lye solution by carefully adding lye to water (always lye into water, never water into lye), cool both oils and lye to roughly the same temperature, combine and blend to trace, add extras, pour into molds, then insulate and wait 24–48 hours before unmolding.
Track temperatures closely; too hot or cold can cause issues like acceleration or poor emulsion. Use a trusted lye calculator and weigh everything precisely on a digital scale. Over time you’ll collect knowledge about how oils affect trace time and what textures different combinations yield.
Cold process safety checklist
- Wear goggles, chemical-resistant gloves, and long sleeves when mixing lye.
- Always add lye to water, not water to lye, to avoid violent reactions.
- Work in a well-ventilated area; vapors from lye dissolving are irritating.
- Keep vinegar nearby only for skin neutralization if immediate rinse is needed; do not rely on it as primary treatment for lye burns—flush with water and seek help.
Additives, preservatives, and shelf life
Most handmade solid soaps and bath bombs don’t need preservatives because they contain little free water once cured. However, if you add ingredients that increase water content—like fresh dairy, aloe vera juice, or watery botanicals—you should refrigerate or use them quickly and consider a preservative.
Antioxidants like vitamin E and rosemary oleoresin prevent oils from becoming rancid and are common in both soap and bath bomb formulations. For products marketed commercially, consider stability testing and include a best-by date to guide customers.
Packaging influences shelf life. Airtight containers or shrink-wrap prevent moisture uptake in bath bombs. For soaps, breathable wrapping (like paper) reduces sweating and helps bars cure while still protecting them from dust.
Troubleshooting common problems

Even experienced makers encounter issues: bath bombs that don’t fizz, soap that separates or develops soft spots, colors that morph, or fragrances that fade. The causes are usually moisture, incompatible additives, or incorrect ratios.
Here’s a short troubleshooting list for quick reference:
- Bath bombs too dry and crumbly: add a tiny amount of liquid a few sprays at a time, or increase oil slightly in next batch.
- Bath bombs fizz prematurely or stick: reduce liquid and work in a less humid environment.
- Soap with persistent soft spots: increase hard oils (coconut, palm) slightly or extend cure time.
- Faded fragrance: some essential oils fade in CP due to heat—use fragrance oils formulated for soap or choose heat-stable essential oils.
Keep a detailed notebook with observations—temperature, humidity, oils used, and how the product behaved. Over a few batches you’ll build a reference library that saves time and ingredients.
Packaging, labeling, and gifting your creations
Presentation matters. Simple kraft boxes, clear window wraps, and hand-tied twine give an artisanal vibe. For bath bombs, tissue or small glassine bags padded with shredded paper protect fragile shapes during transport.
Labeling should be informative and attractive. At a minimum include product name, weight, full ingredient list, and any allergen alerts. If you sell, include contact information and a simple usage instruction—this builds customer trust and reduces returns or complaints.
For gifts, create sets—three small bombs with a matching mini soap, all tied together with a printed card explaining the scent notes and care. Personal touches like a note about why you chose a particular scent elevate a homemade present into a memorable experience.
Selling handmade bath and body products: basics
If you plan to sell, learn about local regulations and labeling laws. Cottage product laws vary by state, and some jurisdictions allow limited sales of handmade cosmetics from home while others require inspections or commercial kitchens for production. Check local health department resources before you list products for sale.
Insurance is wise for sellers—product liability insurance protects you if a customer claims a reaction or injury. Keep production logs and batch photos; they help trace issues and demonstrate diligence if a problem occurs.
Start small: markets, craft fairs, and online platforms like Etsy let you test demand and pricing. Factor in material costs, labor, packaging, platform fees, and a modest profit margin when setting prices. Clear, attractive product photos and honest descriptions will convert curious browsers into buyers.
Sustainability and eco-friendly choices

Small changes improve environmental impact. Choose biodegradable glitter (or skip it), sustainable palm oil alternatives, and recyclable or compostable packaging. Offer refill or bulk options where feasible to reduce single-use waste.
Source oils and bases from suppliers that disclose sustainability practices. If you use essential oils, consider the ecological cost of rare plant extracts and avoid overusing threatened species. Customers increasingly value transparency and responsible sourcing.
Finally, make a habit of recycling rejected batches appropriately. Some imperfect soaps can become household cleaners or laundry soap; crushed, faded bath bombs work in garden soil as an occasional soil amendment if free of synthetic glitter and high salt content.
Personal reflections: lessons from my soap table
I began making bath bombs and soaps to save money and customize gifts, but the practice became a small obsession. My first attempts fizzed weakly or looked like pastel moons; through repeated adjustments I learned that patience—waiting for a proper cure, tracking humidity, and testing fragrances—matters more than chasing complex designs.
A memorable success that taught me balance was a lavender-oat soap: simple ingredients, gentle texture, and steady sales at a holiday market. The secret was a modest superfat level and a fine grind of colloidal oats—small choices that paid off in customer feedback and repeat buyers.
Sharing these crafts with friends and family has been the most rewarding part. Watching someone unwrap a handmade set and recognize the thought behind each scent or color reminds me why many makers begin: not for perfection, but for the small joy of creating something useful and beautiful.
Next steps: practice, iterate, and enjoy
Start with a single reliable bath bomb and one soap base recipe. Repeat it until the process feels natural, then tweak one variable at a time—different oil, a new essential oil, or a new colorant—so you can attribute changes to one factor. This systematic approach speeds learning and reduces wasted ingredients.
Keep a sample box of failed or odd batches for reference; sometimes a batch you don’t like today becomes a breakthrough once reformulated. Join local or online maker communities to share experiences, swap scents, and learn troubleshooting tricks from others who’ve been where you are.
Above all, enjoy the hands-on craft. Whether you make a single beautiful bar or a dozen playful bath bombs, the act of transforming simple ingredients into small luxuries is a creative habit that pays dividends in calm, confidence, and often, delightful suds.


