There is a quiet satisfaction in taking something soft with years written into its fibers and bringing it back to life with needle and thread. Whether it is a lace-trimmed tablecloth that once hosted Sunday dinners or a stack of yellowed napkins found at a flea market, the act of embroidery can transform wear into intentional beauty. This article walks through practical steps, creative approaches, and repair philosophies so you can restore linens that deserve another chapter.
Why vintage linens matter
Vintage linens carry more than utilitarian value; they hold traces of everyday life, regional craft traditions, and personal histories. A faded hem or a faint monogram tells a story about the hands that cared for them, the meals they witnessed, and the moments they safeguarded. Recognizing that provenance shapes how you treat the piece: some stitches should preserve, others adapt.
Restoring linens isn’t just about aesthetics. It’s about extending useful life in a sustainable way and making a visible commitment to repair culture. When you repair and embellish a linen, you slow the cycle of discard and celebrate skilled handwork that’s often overlooked today.
Finding and choosing linens to revive
Good candidates for embroidery revival appear in markets, estate sales, thrift stores, and inherited bundles from relatives. Look for sturdy natural fibers like linen and cotton; they accept thread and gentle cleaning better than synthetic blends. Pay attention to weave tightness and any embroidery already present—these factors affect how much handling the fabric can bear.
It helps to develop an eye for different eras and their typical treatments. Early 20th-century linens often feature drawn-thread work and delicate machine-made lace, while mid-century pieces might have bolder printed motifs. Matching your embroidery style to the piece’s age can enhance coherence, but deliberate contrast can also create a striking modernized heirloom.
Where to shop and what to look for
Estate sales and antique shops are great for larger items like tablecloths and bed linens, while flea markets and thrift stores often yield napkins and hand towels. Bring a close-up light or use your phone camera to inspect fabric condition and construction details. Small stains or thin spots are fixable; large structural damage might be better suited to visible-mending designs rather than delicate restoration.
When buying, trust your nose as well as your eyes. Musty smells can often be washed out, but strong chemical odors or mildew that has penetrated fibers will weaken fabric permanently. If provenance matters—an embroidered name, an unusual weave, or handmade lace—factor that into the price and your restoration approach.
Personal note: a thrifted table runner that taught me restraint
I once rescued a 70-inch runner from a church rummage sale whose central panel had a cluster of small holes and a faint tea ring. My first instinct was to embroider a busy motif to disguise the damage, but after trying a subtle whitework frame and carefully darning the holes, the piece read as an authentic heirloom instead of a patched salvage. That project reminded me that sometimes the most powerful intervention is the one that respects the original voice of the linen.
That experience also shaped how I choose projects now: if a linen already reads as valuable, aim for conservation that enhances rather than overwhelms. If a piece is purely utilitarian, lean into playful or bold embroidery; it’s an opportunity to experiment without erasing the original use.
Assessing condition: stains, holes, and weakened fibers
Before you plan a stitch, do a systematic inspection. Hold the fabric up to daylight to see thinning areas and small holes that are invisible on a flat surface. Mark problem spots lightly with a soluble fabric pen or small safety pins so you can strategize repairs without improvising mid-stitch.
Documenting condition with photos before you clean or mend is wise—especially for items with sentimental or monetary value. Photos provide a reference to measure success and a record to show future caretakers what you did and where you intervened.
Understanding fabric strength and thread counts
Thread count and weave density influence both washing methods and the types of stitches that will hold. Tightly woven linen tolerates fine drawn-thread work and satin stitches, while loosely woven cotton may benefit from supportive backing or larger, reinforcing stitches. If the linen frays when you tug gently at the edge, treat that as a warning to stabilize before any embroidery.
Slip-testing with a small patch of thread can reveal how the fabric responds to tension. Try a couple of stitches in an inconspicuous area, then wash and dry it as you plan to for the finished piece. That little experiment can prevent costly mistakes when you’re working on a treasured item.
Cleaning vintage linens safely
Cleaning is often the first hands-on step, and it needs to be gentle. Many antique linens respond well to a soak in cool water with a mild, pH-neutral soap. Avoid hot water and harsh agitation, which can shrink fibers or set protein stains. Always test a hidden corner first to make sure the dye—if any—won’t run.
When in doubt, treat the linen like delicate silk or a hand-knit sweater: minimal handling, gentle products, and air drying flat. For heavily soiled or valuable pieces, consider professional conservation services, but for most domestic projects, careful home methods work well.
Stain removal techniques that respect fibers
Different stains call for different approaches. Protein stains like egg or blood respond best to cool water and enzyme-based stain removers, while tannin stains from tea or wine can be lifted with gentle oxidizing agents. Avoid chlorine bleach, which weakens fibers and causes yellowing over time.
Oxygen-based bleaches (sodium percarbonate) are often safe for natural fibers when used in diluted solutions and rinsed thoroughly. Spot-treat cautiously and always rinse completely. After a soak, press the linen between towels rather than wringing to remove water while minimizing distortion.
Table: common stains and suggested treatments
| Stain type | Recommended approach | Precautions |
|---|---|---|
| Protein (blood, egg) | Soak in cool water, enzyme cleaner if needed | Avoid heat; test enzyme on hidden area |
| Tannin (tea, coffee) | Oxygen bleach soak or diluted white vinegar | Rinse thoroughly; repeat gently |
| Oil/grease | Pre-treat with gentle solvent-free degreaser, then warm water wash | Do not rub vigorously; test first |
| Mold/mildew | Brush off dry spores, soak in oxygen bleach solution | Wear mask; do not use chlorine bleach |
Stabilizing weak areas and mending before embroidery
Embroidery sits on fabric; if the foundation is weak, embellishment will fail. For thin spots, apply a lightweight support such as a cotton muslin backing or a soluble wash-away stabilizer. Secure with tiny tack stitches that will later be hidden by decorative embroidery or removed if using a wash-away product.
For holes and tears, match your repair method to your aesthetic goals. Invisible darning aims to reconstruct the original fabric look, while visible patches or sashiko-style mending lean into repair as decoration. Both approaches are valid; your choice will shape the final character of the piece.
Invisible darning and supporting thread weave
Invisible darning rebuilds missing threads by re-weaving compatible yarn into the existing structure. Use a supporting hoop to keep the area flat and a fine needle and thread that mimic the original fiber thickness. The result is subtle and preserves the linen’s original look when done carefully.
Invisible repairs are time-consuming but appropriate for monograms or center panels where visual continuity matters. When structural integrity is the priority over aesthetics, a backing patch stitched securely across the wrong side is a simpler, longer-lasting solution.
Visible mending as aesthetic choice
Sashiko-inspired basting, decorative darns, and bold appliqué transform damage into design. Visible mending shines on casual pieces like tea towels or picnic linens that will be used frequently. It also turns repairs into an opportunity for storytelling—contrasting threads and geometric patterns invite conversation about sustainability and craft.
Be intentional about color and scale when visible mending. Large, bright stitches can overwhelm delicate lace, but they will read beautifully on a robust, utilitarian cloth. Use visible mending when the goal is to celebrate use rather than to hide it.
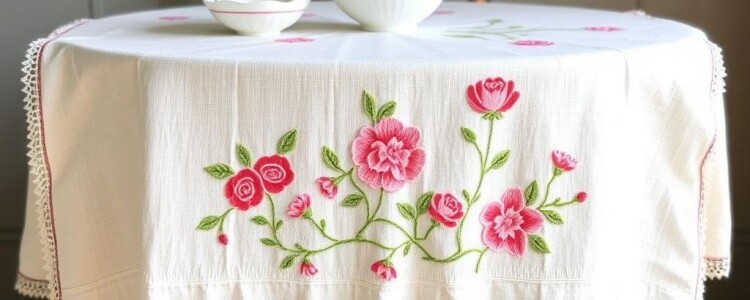
Designing your embroidery: motifs and placement
Design choices should consider the linen’s purpose, age, and existing decoration. A subtle sprig in a corner can refresh a napkin without overpowering its simplicity. A continuous border or a set of repeating motifs can unify a mismatched set of linens into a coordinated collection.
Think about negative space and how your stitches will interact with worn areas. Embroidery can deliberately frame flaws, turning them into compositional focal points instead of distractions. Sketching multiple layouts on paper or using tracing paper directly on the linen helps visualize the balance before you commit thread to fabric.
Balancing original charm with contemporary touches
There is a satisfying tension between honoring a piece’s original aesthetic and introducing contemporary flair. For example, pairing traditional whitework on a linen table runner with a single modern color accent at the corners creates a dialogue between eras. The trick is to make additions feel intentional rather than corrective.
When layering modern motifs over antique embroidery, maintain respect for original stitches by avoiding direct overwriting. Instead, embellish around or between existing elements so both old and new remain legible.
Choosing color palettes and thread types
Natural fiber linens often read warm due to age; choosing threads with slightly muted or warm undertones helps harmonize new embroidery with the base fabric. Organic cottons, silk threads, and linen floss offer different sheens—silk gives a luminous effect, while cotton has a matte, traditional look. Experiment with thread samples against the cleaned linen to see what reads well in different lights.
Metallics can be dramatic but require careful handling: they may be stiff and can abrade delicate fibers. If you want sheen without risk, consider fine silk or rayon threads that offer luster with greater flexibility over older cloth.
Techniques for transferring patterns and marking fabric
Pattern transfer should be invisible on the finished side or easily removed. Lightboxes, window tracing, and temporary water-soluble pens are reliable methods. For very thin linens, avoid iron-on transfers that add pressure; do simple pencil tracing on tracing paper, prick a line of tiny holes, and pounce fine chalk or washable pigment through them.
If your linen has a pattern printed or woven into it, incorporate that structure into your embroidery rather than fighting it. Align motifs with existing lines and repeats so the final piece feels intentional and cohesive.
Tools I rely on for accurate transfers
My go-to tools are a slim lightbox, a pack of fine water-soluble pens, and a small prick-pounce set for delicate work. The pounce method is especially helpful when working on fragile fabrics you don’t want to press with an iron. A pair of fine tweezers and a magnifier lamp also make accurate placement and stitch work less stressful.
Keep transfer marks light and test removability. Some pens fade with humidity over weeks, so plan your work to avoid having marks linger under finished embroidery. For heirloom pieces, photograph any markings before you remove them so there is a record of the design process.
Stitch choices: classic and creative options

Choosing stitches depends on the effect you want and the fabric’s strength. Satin and long-and-short stitches fill shapes and give smooth surfaces, while French knots and bullion knots create texture. For structural repairs, herringbone, darning, and buttonhole stitches add strength and visual interest.
Experiment combining techniques: use stem stitch outlines with tiny seed stitches filling the interior for a painterly texture, or pair pulled-thread work with minimal surface embroidery for a subtle, lacy effect. Mixing stitches can echo the layered history of a vintage linen.
List: go-to stitches for vintage linens
- Backstitch — for clean outlines and lettering
- Satin stitch — for smooth filled shapes
- French knot — to add small raised points
- Buttonhole/blanket stitch — for securing edges and appliqué
- Darning stitch — for structural hole repair
- Pulled thread — for airy, openwork accents
- Running stitch or sashiko — for visible mending and texture
Adapting stitch tension for aged fabrics
Aged fabric requires gentler tension. Pull too tight and you will pucker or tear the linen; pull too loose and the embroidery will not lie flat. Use shorter stitch lengths and distribute tension by anchoring threads at several points rather than relying on a single knot.
A small embroidery hoop helps maintain even tension, but be cautious: hoops can leave slight marks if left for long periods. For fragile textiles, work with a padded hoop or skip the hoop entirely, using a frame with drawn fabric support to avoid concentrated pressure.
Combining repair with ornamentation: creative strategies
When a linen shows a pattern of wear—say, along the hem where hands regularly touched—you can echo that worn pathway with a linear border motif that both reinforces and beautifies. Designing motifs that follow stress lines turns weakness into guiding composition for your embroidery.
An underused approach is to create a “map” of the linen: intentional, labeled accents that mark stains, repairs, and provenance. Tiny stitched dates or initials near mends document interventions and become part of the story, particularly valuable for family heirlooms.
Case study: a patched napkin set turned into a coordinated collection
I had a set of eight napkins with various stains and one with a long tear. Instead of discarding the trio, I stabilized each napkin and embroidered a slim geometric border using the same color palette across all eight. The tear received a visible sashiko repair in the same thread, which read as a design choice when placed next to the contiguous borders. The set looked curated instead of patched.
That project taught me that repetition and restraint unify disparate repairs. The border became the unifying element, and the visible mending served as a deliberate accent rather than an emergency fix.
Practical projects: step-by-step examples
Below are four approachable projects that illustrate common techniques and outcomes. Each project lists necessary materials and a concise workflow so you can replicate or adapt the steps for your own linens.
Project 1: Refreshing a monogram
Materials: small needle, matching embroidery floss, light stabilizer, water-soluble pen. Begin by cleaning the area and stabilizing the backing. Trace or lightly mark the existing monogram outline, then reinforce worn threads with tiny darning stitches that follow the original letterforms. Finish with neat satin stitches or a backstitch outline to sharpen the monogram.
This is an ideal intro project because it has a small footprint and big visual impact. A refreshed monogram makes an old piece feel cared-for while preserving the original identity of the textile.
Project 2: Visible mend for a towel
Materials: cotton or linen patch, sashiko thread or thick embroidery floss, large-eye needle. Cut a patch slightly larger than the hole and place it on the wrong side of the towel. Use parallel running stitches or sashiko patterns to bind the patch to the towel, working deliberately to spread tension. Use contrasting thread for graphic effect or tone-on-tone for subtlety.
Visible mending suits items meant for regular use. The structural stitching keeps the towel safe for laundering while adding a handcrafted look often appreciated in modern kitchens.
Project 3: Table runner border enlargement
Materials: embroidery frame, silk or cotton thread, pattern tracing materials. Decide on a border repeat that complements existing motifs. Transfer the design to tracing paper and then to the linen corners. Stitch in sections, alternating sides to keep the fabric flat. If the runner is fragile, stabilize the backside with lightweight muslin before stitching.
A border refresh can make an old runner feel new without replacing its identity. Keep motifs proportional to the runner’s scale, and don’t be afraid to pause and view your progress from a distance to check balance.
Project 4: Heirloom pillow from a vintage sheet
Materials: sheet, pillow insert, decorative stitching thread, trim if desired. Cut panels from an intact section of a sheet, avoiding areas with significant wear. Add embroidered accents at each corner or a central medallion, then sew the panels into a pillow with French seams for durability. Use linen or cotton thread when assembling to match the base fabric.
This project repurposes large linens that are no longer practical for bedding. A single embroidered medallion makes the pillow feel intentional and honors the original material.
Finishing and caring for newly embroidered linens
Once embroidery is complete, finishing steps ensure the piece wears well. Block the linen gently to straighten distortions—dampen lightly and pin it to shape on a flat surface, using a towel beneath and away from direct sun. Press from the wrong side using a medium iron if the fabric tolerates heat; use a press cloth for delicate threads.
Labeling care instructions and the date of intervention on a small fabric tag can be helpful for future owners. Include a brief note about the materials used and any special cleaning requirements to preserve both the base linen and the embroidery over time.
Washing and long-term care
Most embroidered linens do best with gentle hand washes or delicate cycles in cold water. Turn pieces inside out or place them in a mesh laundry bag to prevent abrasion. Dry flat to avoid stretching; if hanging to dry, do so evenly across the width to prevent skewing seams and borders.
Store linens in breathable cotton bags, not plastic, and avoid cedar blocks touching thread directly as aromatic oils can sometimes discolor natural fibers over long periods. For heavily used items, rotate them to reduce wear concentration.
Documenting provenance and repairs

Recording the story of your restoration adds value and preserves context. Create a simple restoration log: date, materials used, techniques applied, and photos before and after. For family heirlooms, adding a line about who owned it and any known history strengthens the object’s narrative.
Attaching a small, discreet fabric label that lists this information helps future caretakers understand what was done and why. This practice honors the textile and ensures transparency if the piece is ever appraised or gifted.
Selling, gifting, and ethical considerations

If you plan to sell or gift a revived linen, be transparent about interventions. Describe the condition before work, the cleaning methods used, and the specific repairs or additions. Buyers and recipients appreciate honesty; a documented repair can increase an object’s appeal by highlighting thoughtful craftsmanship rather than hiding damage.
Ethics also extend to sourcing: if a linen has significant cultural or historical value, consult specialists before altering it. Items with visible maker marks, unique regional techniques, or museum-level importance may warrant conservation-grade intervention rather than home restoration.
Resources, inspiration, and communities
Books on historic embroidery, conservation forums, and local guilds provide invaluable guidance. Online platforms like specialized forums and social media groups offer project feedback and pattern sharing, but prioritize sources that emphasize preservation ethics. Workshops and local classes are great for hands-on learning where instructors can demonstrate tension control and mending techniques up close.
Keep a digital inspiration folder of patterns, stitches, and color combinations. Over time, you’ll build a personal library of motifs that suit your aesthetic and the linens you find, making project planning quicker and more intuitive.
Recommended starter reading
A few practical resources to explore are technique-focused stitch guides, books on textile conservation basics, and modern visible-mending compilations that showcase creative approaches. Libraries often hold older pattern collections that are public-domain and rich with period-accurate designs for those who prefer historical fidelity.
Workshops from community colleges and fiber arts centers provide the benefit of seeing materials up close and getting immediate feedback—an advantage that videos cannot fully replicate. Pair reading with practice to translate knowledge into confident hands-on skill.
Final encouragement and next steps
Reviving linens with embroidery is a slow, satisfying craft that rewards careful observation and modest tools. Start small, choosing a napkin or towel to learn how your preferred fabrics respond to thread, tension, and cleaning methods. Each successful project builds confidence and widens the range of linens you’ll rescue.
Keep records of your methods and celebrate the stories you preserve—name, date, and technique become part of the textile’s continuing life. With mindful repair and thoughtful design, a tired cloth becomes an heirloom with a new chapter, ready for daily use or deliberate display. Pick up your needle, and let the fabric tell you where to begin.


