Lace crochet sits at an intersection of craft and architecture: delicate loops that, together, form deliberate negative space and surprising strength. In this article I’ll take you through techniques, materials, pattern reading, and design thinking so you can tackle complex lace with confidence. Expect practical tips, a few personal anecdotes, and clear steps to move from chart confusion to a finished, block-worthy piece.
Why advanced lace still matters
There’s a quiet satisfaction in turning a handful of cotton thread into an airy motif that catches light like stained glass. Advanced lace doesn’t exist merely to impress; it’s a study in control — of tension, rhythm, and the relationship between stitch and void.
Historically, lace signaled time spent and skill earned, but today it also offers modern designers a texture palette unlike any other. Working in lace teaches precision, improves pattern reading, and sharpens your eye for proportion in any crochet project.
For many of us, lace crochet is meditative: the repetitive motion of chains and picots becomes a scaffold for problem solving. When a pattern sings, it’s because every stitch was chosen to support the whole; understanding that selection is what this article aims to help you do.
If you’ve ever hesitated at a pattern full of symbols and long stitch names, you’re in the right place — I’ll demystify chart language and show how to convert those symbols into steady rhythm and progress.
Tools and materials for advanced lace
Choosing the right materials is the first step toward success. Unlike chunky blankets where forgiving yarn hides uneven tension, lace demands thread that shows every stitch, and hooks that encourage a consistent gauge.
Thread sizes, hook sizes, and fiber choices affect drape, stitch definition, and how readily your piece will block. Below is a quick reference table to get you started; use it as a guideline rather than a rulebook, since designer intent and personal tension vary.
| Thread size | Typical use | Common hook size (US) | Metric |
|---|---|---|---|
| Size 10 | Doilies, table linens | Steel 7–11 | 1.0–1.65 mm |
| Size 20 | Light shawls, trims | Steel 3–6 | 1.6–1.9 mm |
| Size 30 | Delicate lace motifs | Steel 2–4 | 1.0–1.75 mm |
| Size 40–50 | Fine edgings, heirloom work | Steel 0–2 | 0.75–1.25 mm |
Hooks matter beyond number labels. Some steel hooks have longer shanks; ergonomic aluminum hooks can warm to your hand and feel smoother. Try different materials to see which helps you keep an even tension over long sessions.
Fiber choice changes everything. Mercerized cotton gives brilliant stitch definition and holds blocking well, while linen softens with wear and produces relaxed drape. Silk or silk blends create luxurious sheen, but the slippage can challenge tight lacers.
Choosing crochet thread
When I began working with size-10 cotton, I expected more control; instead I learned patience. Smaller thread demands slower hands, but it rewards you with lace that reads like filigree. When selecting thread, check how it twists: a single loosely spun thread can split easily under a fine hook and make uniformity difficult.
Look for mercerized cotton for crisp points and long-term durability. If you want a softer halo, choose mercerized blends or floral-weight yarns, but be prepared to block more carefully to achieve the same openness of pattern.
Hook selection and alternatives
One of the most common mistakes is matching a hook solely by number and not by feel. Different manufacturers produce different profiles for the same listed size, and that subtle difference can tilt an entire project toward too-loose or too-tight tension.
Consider a small set of steel hooks for thread work and keep one or two hooks on hand with comfortable grips for longer sessions. A tiny change — switching from a tapered to a rounded head — can ease yarn over decisions and reduce split stitches.
Essential stitches and motifs
Advanced lace relies on a vocabulary of familiar stitches used in deliberate combinations. Mastering a handful of motifs frees you to understand patterns rather than blindly follow them.
Picots act like punctuation in lace: small, decorative stops that also stabilize a scallop. Shells and fans create rhythm and line; clusters and popcorns form focal textures. Understanding how each element behaves under tension helps you predict the final movement of the fabric.
Motifs like the pineapple are a staple of fine lace. That shape falls between art and geometry; it uses chains and clusters to create elongated apertures that draw the eye. Filet crochet, by contrast, depends on a grid-like structure of filled and open squares, leading to pictorial or repetitive patterns.
Irish crochet introduces raised motifs joined by a mesh ground, which gives sculptural depth. Combining these vocabulary pieces allows designers to blend flat, airy fabric with textured appliqué within the same piece.
Picots, shells, and fans
Picots are usually made by chaining three or four and slip-stitching into the first chain. They’re small but they stabilize edges and give that classic lace tooth. Adjust the chain count to scale the picot to the thread and the rest of the motif.
Shells and fans are variations of grouped stitches worked into a single base point. Smaller shells offer subtle undulations while larger fans create pronounced scallops and openwork. The spacing between shells determines how airy or dense the finished lace will appear.
Clusters, popcorns, and raised motifs
Clusters and popcorns introduce texture and catch light differently than flat stitches. They can be used as centers of motifs or to emphasize pattern transitions. Work them with consistent stitch height and secure them firmly so blocking doesn’t flatten the relief.
When making raised motifs in delicate thread, keep the stitch count around the cluster stable; otherwise the surrounding mesh will pucker. Test a swatch and adjust stitch repetition to preserve the motif’s proportions.
Pineapple and other classic motifs
The pineapple motif rewards careful counting and symmetry awareness. Its charm is partly visual and partly mathematical: the repetition of increases and decreases creates that teardrop lattice. Practice the motif at a small scale first, then try enlarging it within a larger motif grid.
Other reliable motifs include tall lacy leaves, rosettes, and spider-web centers. The challenge is learning how to connect them without destroying the visual grammar of the piece; seams, joins, and mesh choices determine whether motifs float or lock together.
Reading charts and notation

Charts are a shorthand language for lace, and learning to read them flips a switch for advanced work. Symbols show placement and sequence more clearly than long text descriptions, particularly where repetitive stitches create texture rather than dense instruction.
Start by familiarizing yourself with a chart legend; most pattern charts reuse the same basic symbols. A tiny open circle means chain, a filled dot might mean slip stitch, and a tall T with a slash suggests a treble. Getting comfortable with these symbols reduces errors and speeds up motif tracking.
How to follow a diagram
Look for the start symbol and whether the chart is worked in rounds or rows. For rounds, a spiral or arrow often indicates direction; for rows, numbering on alternating sides may show read direction. If you’re unsure, make a tiny practice swatch following the chart until the rhythm feels intuitive.
When a chart shows repeating sections, highlight them before you start. Use a removable marker or a sticky note to keep your place while your hands move through long sequences of chains and tall stitches.
Common chart symbols
- Open circle: chain (ch)
- Filled dot: slip stitch (sl st)
- Small X or + : single crochet (sc)
- T with a single slash: double crochet (dc)
- T with two slashes: treble (tr)
- Grouped symbols joined at the top: shell or cluster
Memorize a small group of symbols first rather than trying to learn a long list. In my practice I print the chart legend and keep it next to my working piece until those marks become muscle memory.
Techniques that elevate lace

Tension control is the silent engine of lace. Small variations make dramatic visual differences because lace relies on negative space; an over-tightened chain can close a mesh and make the whole motif read heavier than intended.
Invisible joins and neat beginnings are essential when motifs repeat or when you want a seamless look. Learn slip-stitch joins and mattress stitch variants for crochet so seams disappear into the design rather than advertise themselves.
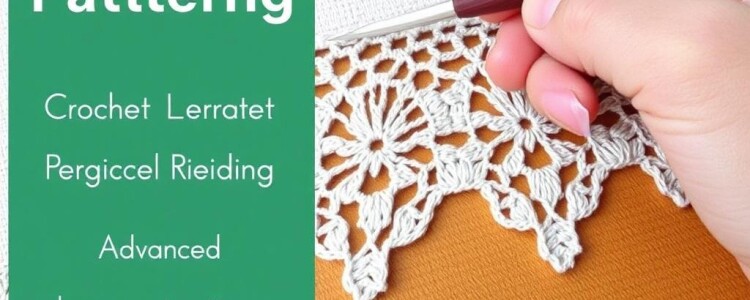
Blocking is where a pattern reaches its final form. Without blocking, lace lies limp and irregular; with proper blocking, motifs open, lines straighten, and the overall geometry becomes legible. Blocking is not optional if you want polished, heirloom-quality pieces.
Tension practices and warm-ups
Before a major lace session, I always work a handful of chains and a small motif to settle my hands. Warming up helps your fingers remember the path and reduces the urge to grip the hook too tightly. If your stitches tighten after a coffee break, repeat the warm-up again to recalibrate.
When working long rows of uniform mesh, shift your hand position slightly every 20–30 minutes to avoid repeating a mechanical tension. Small stretches and mindful breathing also help maintain even loops and steady rhythm.
Invisible joins, joins as design elements
An invisible join often uses slip stitches or single crochets placed into precise entry points so the join lies flat. These joins are valuable when you need a continuous line of lace without raised seams. Equally, visible joins can be a purposeful design choice when you want a beaded seam or contrasting texture.
When joining motifs into a larger fabric, plan whether joins will be knotless or tied for stability. Knotless joins keep the piece supple, while a few discreet knots can help maintain a larger structure, like a collar or decorative panel.
Blocking methods that work
Blocking wires are indispensable for large lace panels or shawls. They smooth curves without piercing points and create a straighter edge. For small doilies or motifs, using pins into a foam board allows precise shaping of scallops and points.
Steam blocking versus wet blocking depends on the fiber. Cotton responds well to wet blocking, while silk and delicate blends often benefit from careful steam. Always test on a scrap before aggressively applying heat or moisture, because fibers react differently.
Designing your own lace motifs
Designing lace is part composition, part engineering. You balance open space with supportive stitches so the fabric remains stable and beautiful. My first original motif came from doodling leaf shapes in the margins of a notebook and translating those curves into chains and decreases.
Begin with proportion sketches. Draw the outline of a motif and divide it into visual zones: center, body, and edge. Decide how many stitches tall each zone will be and which stitch families best express those shapes.
Translate those sketches into stitch counts and small swatches. Test repeatedly. Lace design is iterative: a motif that looks perfect on paper often needs 2–3 adjustments in stitch density or join placement to behave as intended when blocked.
Steps to design a lace motif
- Sketch shape and mark symmetry axes.
- Choose stitch types for texture and openness.
- Calculate stitch counts and test small swatches.
- Adjust increases/decreases to preserve shape after blocking.
- Draft a chart and test a full-size prototype.
These steps keep the process manageable and reduce late-stage surprises, like an edge that refuses to lie flat or a motif that balloons when wet.
Translating sketches into charts
Begin charting from the center outward for radial motifs and from one edge for borders. Use consistent scale so one square on the chart represents a predictable stitch or chain length. This predictability helps you estimate how many repeats will fit across a shawl or panel.
When you test a charted repeat, write margin notes about any adjustments you made. Those notes become invaluable if you revisit the design months later or decide to scale it up for a different thread size.
Projects and pattern ideas to challenge your skills
Advanced lace works well in accessories and small garments where the delicate structure can shine. Shawls, collars, and lightweight cardigans are classic canvases: they show off motifs and benefit from that open, air-catching structure.
Doilies and decorative panels are great learning projects because they scale down the pattern and finish quickly. I often test new motifs in a doily format before committing to a larger piece, which saves time and thread while revealing structural quirks.
For wearable lace, consider reinforcement strategies. Necklines and cuffs almost always need a lining or reinforced border to prevent stretching. A well-placed facing or narrow knitted band can protect a lace garment from wear while remaining invisible.
Shawls and wraps
Shawls are forgiving because a gradual increase in width accommodates growth and shape. Use repeating motifs like fans or diamonds and play with border weight to frame the piece. A dramatic scalloped edge can transform a modest mesh into an heirloom focal point.
When designing a triangular or semicircular shawl, plan the increases so they follow the motif’s visual rhythm. Erratic increase placement can break a motif line and distract from the lace’s geometry.
Collars, edgings, and heirloom garments
Small lace collars and edgings let you add intricate detail to otherwise simple garments, and they’re quick to make. Keep practical wearability in mind: for a collar that will touch skin, choose softer mercerized blends or a linen-cotton mix that won’t irritate.
For heirloom garments, reinforce seams and consider a reversible join so both sides look intentional. I once joined a delicate yoke with a narrow crocheted band that disguised the seam and provided much-needed structure.
Home decor and unexpected uses
Lace looks wonderful as lampshade covers, framed wall art, or layered over solid fabric in pillows. When you apply lace to home decor, think about backing and durability; a lace overlay sewn onto linen can be washed more easily and showcases the pattern against a smooth field.
Experiment with color: dyeing a finished doily or overlay can emphasize texture and give old patterns a modern twist. I’ve revived vintage motifs with subtle ombré dyes that make the stitches read in new ways.
Troubleshooting common problems
Even experienced crocheters encounter problems: a motif that won’t lie flat, uneven mesh, or joins that pucker. The solution usually returns to basics: assess tension, check stitch counts, and verify your blocking method.
If your lace is too tight, try moving up one hook size or loosening your grip. Conversely, if the lace looks loose and lacks definition, tighten slightly or switch to a fiber with crisper twist.
My fixes for common issues
When my pineapple panels puckered at the joins, I discovered the join stitch was added without compensation for the extra bulk; removing one chain in the adjacent mesh restored balance. Small count adjustments like that can resolve many irregularities without overhauling the motif.
For unsteady edges, adding a thin reinforcing row of single crochet or a chained picot edging often stabilizes the silhouette. This small frame can make an otherwise limp edge read as crisp and intentional.
When to rip back and when to adapt
Decide whether to frog based on the amount of revising needed and how much time you can spare. If one repeat is off by a stitch, it’s usually faster to unpick and fix; if the entire motif misbehaves due to incorrect hook or thread choice, adapt the design or start over with new materials.
Keep small notes with each project about what worked and what didn’t. Over time those notes become your personal troubleshooting manual and reduce repeated mistakes.
Sourcing patterns and continuing learning

There’s no shortage of lace patterns in books and online, but choose resources that include both charts and thorough schematics. A good pattern shows multiple perspectives: a chart, a written sequence, and a finished-piece photograph that clearly matches the chart so you can verify your progress.
Workshops and local guilds are excellent for hands-on guidance. I’ve learned more from a single two-hour guild meeting where someone demonstrated a tricky join than from hours of solitary trial and error.
Books, designers, and online resources
Look for authors who explain reasoning, not just steps. Designers who share their development notes, alternative stitch counts for different thread sizes, or blocking recommendations tend to produce more reliable patterns. Online forums, video tutorials, and pattern archives provide cross-references that help when charts are ambiguous.
Subscribe to one or two designers whose aesthetic you admire and follow their updates; designers often release short pattern series that progressively build skill with new techniques.
Practice routines and community
Create a practice routine: one new stitch family per month with swatches and small projects. Share photos in community groups to get feedback on joins and blocking methods. Constructive peer review accelerates learning and introduces alternate approaches you might not have considered.
Staying curious will keep your work fresh. Try combining motifs from different traditions — a filet grid with raised Irish motifs, for example — to discover new visual languages and technical solutions.
Final thoughts and next steps
Advanced lace is a conversation between your hands and the material; the more you listen, the better you become at coaxing the intended form from raw thread. Each piece you make will teach something about balance, tension, or proportion that you can carry into the next project.
Start small, practice deliberately, and don’t be afraid to undo work until it reads right. With consistent practice, chart fluency, and the right tools, those arresting, architectural lace patterns that once looked intimidating will become joyful challenges you seek out.
If you want a practical next step, choose a single motif from a pattern you admire, chart it on graph paper, and make three small swatches at different hook sizes. Compare them after blocking and note which approach preserved the intended shape best.


