I remember the first time I picked up a length of copper wire and transformed it into a small pendant; the feeling was equal parts curiosity and satisfaction. This article walks through the practical skills, tools, and step-by-step projects that make wire jewelry accessible, whether you’re curious about a new hobby or want to add handmade pieces to your shop. Read on for clear techniques, helpful tips, and real-world advice to build your confidence with wire.
Why choose wire for jewelry?
Wire is a uniquely forgiving medium for jewelry makers because it bends, holds shape, and can be finished in many ways. Unlike some crafts that require kilns or expensive equipment, wirework relies on a handful of hand tools and material you can find at most craft stores or online. For makers who enjoy problem solving and small, tactile projects, wire offers an immediate path from idea to finished piece.
Wire also scales beautifully with experience; a simple wrapped loop is something a beginner can master in an hour, while intricate weaves and wire sculptures can keep an advanced maker engaged for years. The range of metals—from copper to sterling silver and plated base metals—lets you experiment with color, weight, and price point. Because pieces can be created quickly, wire jewelry is ideal for prototyping designs or producing small batches for markets and boutiques.
Finally, wire invites a hands-on design process that often results in unique, personal items rather than cookie-cutter outcomes. Each bend, hammer mark, or wrap adds character, and slight variations are part of the charm. This human element makes wire jewelry appealing both to makers and to buyers who appreciate one-of-a-kind pieces.
Essential tools and materials
Basic tools you’ll want to own
Start with a pair of flush-cutters, round-nose pliers, and chain-nose pliers; these three tools cover most beginner tasks. Flush-cutters give clean snips without crushing the wire, while round-nose pliers are essential for making loops and curves. Chain-nose pliers grip and straighten, and their flat-jawed cousins are useful for tucking ends and finishing connections.
As you progress, add nylon-jaw pliers to prevent marring, a pair of bent-nose pliers for awkward angles, and a small jeweler’s saw if you plan to cut sheet metal. A steel or rawhide mallet and a bench block open up hammer-forming techniques that strengthen wire and change its texture. Don’t forget a small ruler or calipers for consistent measurements—precision matters when making matching earrings or rings.
Quality tools are an investment that pays off in cleaner work and fewer frustrations. In my first year I learned the hard way with cheap cutters that left ragged ends and destroyed wire. Upgrading to a reputable brand improved the finish of every project and saved time in the long run.
Wire types, gauges, and how to choose
Wire comes in different metals—copper, brass, sterling silver, gold-filled, and plated base metals—and in various gauges that determine thickness and flexibility. Lower gauge numbers mean thicker, stiffer wire; higher numbers are thinner and easier to bend. Choosing the right combination depends on the project: structural elements like ring shanks need thicker gauge, while decorative wraps and coils benefit from thinner wire.
Here’s a simple reference table to help match gauge to common uses. Remember that gauge systems differ slightly between manufacturers, and the table below is a general guide rather than a strict rule.
| Wire gauge | Approx. diameter (AWG) | Common uses |
|---|---|---|
| 18–16 | 1.02–1.29 mm | Ring shanks, ear wire bases, structural frames |
| 20 | 0.81 mm | Clasps, small frames, sturdier wraps |
| 22 | 0.64 mm | Wrapped loops, basic links, medium coils |
| 24–26 | 0.51–0.40 mm | Delicate wraps, fine detail, wire weaving |
| 28–30 | 0.32–0.25 mm | Micro-coiling, fine weaves, accents |
For beginners I often recommend starting with a spool of 20 or 22 gauge and a spool of 24 or 26 gauge in the same metal. That combination covers most pendant, earring, and simple ring work without overwhelming you with options. Copper is affordable and easy to anneal, making it an ideal practice metal before moving on to precious metals.
Basic techniques: the building blocks

Measuring and cutting wire cleanly
Accurate measurement is the first step toward consistent results, especially when producing pairs of earrings or rings for a collection. Use a fine ruler or calipers to mark lengths and cut with flush-cutters, holding the wire steady to avoid bending the piece you’re keeping. Make cuts perpendicular to the wire so the ends sit flush when wrapped or tucked.
When cutting thicker wire, make several close snips rather than trying to bite through in one motion; this reduces tool stress and gives a better edge. If the cut end is rough, file it smooth with a fine metal file or emery paper. A neat end is easier to tuck and less likely to scratch the wearer.
Keep spare lengths of wire organized in labeled tubes or spools; it speeds up workflow and prevents buying the same gauge or metal twice. I keep a small notebook with typical lengths I use for common pieces, which helps when I need to produce multiples quickly for a craft fair.
Creating consistent loops and wrapped loops
A wrapped loop is the backbone of many wire projects and a skill worth practicing until it becomes second nature. Start by making a simple loop with round-nose pliers, then wrap the tail around the base of the loop two to three times for a clean, secure finish. Keep wraps tight and close together to avoid a sloppy look.
To make consistent loops, mark the pliers where you like the loop size and use that marker as a visual guide. If you plan to make many loops of the same size, consider using a dowel or mandrel to form identical shapes. For a decorative touch, make the loops slightly oval or heart-shaped, but maintain symmetry when the piece requires a pair.
When wrapping, hold the loop steady with chain-nose pliers and wrap with the dominant hand, turning the wire around the base with careful tension. If the tail refuses to sit flush, use flush-cutters to trim closely and tuck the end with chain-nose pliers or a file to remove any sharpness.
Forming shapes: curves, bends, and mandrels
Controlling shape comes down to the right tools and thoughtful technique rather than brute force. Mandrels—cylindrical rods in different diameters—are indispensable for making consistent rings, bangles, and circular pendants. Wrap wire around the mandrel and refine the form with pliers and a mallet for a smoother, rounder finish.
When forming curves freehand, rotate the wire in your fingers rather than bending at a single point to create smooth arcs. For sharp bends, use flat-jawed pliers and score lightly with a file first if the wire is very hard. Annealing, a process of heating and letting the wire cool, makes it softer and easier to shape; it’s especially helpful with sterling and some alloys.
Be mindful of metal fatigue—repeated bending can lead the wire to crack. If a section feels brittle or creaks, cut it out and start fresh or anneal the wire to restore ductility. I once pushed a wire frame until it snapped; the lesson stuck: form gently, and finish with measured force.
Hammering and work-hardening
Hammering wire on a steel block both flattens and hardens it, changing both the look and the structural properties of the piece. A few controlled taps can strengthen a ring shank or flatten a wrapped section for a more reflective surface. Use a rawhide or nylon mallet to change the shape without leaving heavy marks, or a steel hammer for a textured, hammered finish.
Work-hardening happens naturally as you bend and shape wire, making it stiffer; sometimes that’s desirable, sometimes not. If the wire becomes too hard and resists bending, anneal it to soften and continue shaping. Conversely, if you want a rigid final piece, deliberately work-harden by hammering and twisting to achieve that stiffness.
When hammering for texture, vary your strikes for an organic feel rather than a mechanical pattern. I like to alternate light and medium hammer taps to give pendants subtle character that catches light differently across the surface.
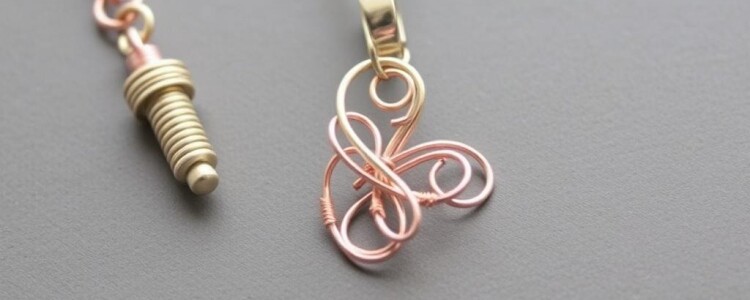
Coiling, spirals, and decorative wraps
Coiling wire creates delightful visual interest that reads as craftsmanship even in simple pieces. Use a mandrel, drill bit, or tapered mandrel to form even spirals and coils; for tight microcoils, wrap thin wire around a thicker core wire and then remove the core if desired. Keep tension steady for tight, uniform coils.
Decorative wraps can secure stones or add texture when wrapped around a frame. When coiling wraps around a base wire, anchor the start with a couple of tight wraps and finish by tucking the tail so it won’t snag. Combining different gauges in a coil—thicker core, thinner wrap—adds contrast and dimension.
Experiment with finishing the ends of spirals: hammered tips, slightly flattened ends, or small loops can all provide subtle variation. I often use a spiral as the focal element on a pendant, then echo the motif with smaller coil accents in the ear wires to create a cohesive set.
Wire weaving and more advanced thread techniques
Wire weaving involves wrapping thin wire tightly around two or more structural wires to create patterns, texture, and stability. Start with a stable base of two parallel wires and wrap a thinner gauge repeatedly to form a woven band or decorative section. Patience and even tension are key to avoid gaps or twisted wraps.
Common weaves include simple ladder-like wraps, figure-eight patterns, and more intricate basket weaves. Use a consistent wrap count and a bead stopper or small clip to hold the tail in place while you work. Woven sections make excellent focal bands for rings and bracelets and can cradle stones with a soft, textile-like appearance.
As an intermediate exercise, try weaving around a curved frame to make a pendant; this teaches how to adjust tension when the base wire changes direction. My own first woven pendant took several attempts to keep the weave flat, but the tactile, fabric-like effect made the effort worthwhile.
Step-by-step projects to practice core skills

Project 1: Simple wrapped loop pendant
This pendant is a compact project that teaches cutting, making a wrapped loop, and creating a basic bail for a chain or cord. You’ll use one wire gauge for the frame and a thinner gauge for the wrap, which reinforces the loop and adds a clean finish. Keep the design simple so you can focus on consistency and finish quality.
- Cut a length of 18–20 gauge wire about 4–6 inches long for a small pendant frame.
- Use round-nose pliers to form a simple loop at one end and bend the wire into your chosen pendant shape.
- Cut a 24–26 gauge tail about 3–4 inches long and wrap it tightly around the base of the loop two to three times.
- Trim the excess wrap wire close to the head of the wraps and tuck the end with chain-nose pliers.
- File any sharp edges, gently hammer the frame if you want added strength, and polish to finish.
Small adjustments—making the loop slightly bigger or changing the wrap count—alter the pendant’s feel and strength. Try a few iterations to find a size that suits the beads or charm you plan to add. When I teach this project, students often finish several pendants in a single session once they master the wrapped loop rhythm.
Project 2: Basic wire ring
A simple wire ring demonstrates measuring, shaping on a mandrel, and finishing the ends so the ring can be worn comfortably. Use 18–20 gauge wire for a stable band, but consider a double-wrap or decorative wire for added interest. Practice measuring so your rings fit correctly without a lot of resizing.
- Measure the required length by wrapping wire around a ring mandrel at the desired size and marking the overlap point.
- Cut the wire and form the ends into small loops or hammer-flat sections for comfort and aesthetics.
- Overlap the ends slightly and make a few tight wraps with a thinner gauge to secure, or form a decorative twist where they meet.
- File and smooth all edges, then shape the ring evenly around the mandrel until round and comfortable.
For a clean commercial look, make two identical pieces and solder or rivet them together where they meet, but for many handmade styles a wrapped finish reads as intentional and attractive. I make a lot of double-wire rings for markets because they’re comfortable and hold up well to wear.
Project 3: Wire-wrapped bezel for a cabochon
A wire-wrapped bezel secures a cabochon without glue or solder and lets you incorporate stones with irregular shapes. This project requires planning the bezel’s frame, making prongs or a surrounding lip, and weaving or wrapping to secure the stone. Start with a small cabochon and practice fitting the stone snugly within the frame.
- Create a frame from thicker wire sized to the cabochon’s outline and solder or tightly wrap the ends to form a closed shape.
- Use thinner wire to wrap around the frame, building up a lip that slightly overlaps the stone when pressed into place.
- Once the lip is formed, gently set the cabochon into the bezel and tighten wraps or prongs until the stone is secure.
- Finish by tidying wraps, trimming and tucking tails, and polishing the piece for wearability.
For beginners, start with softer, rounded cabochons rather than faceted stones; the rounded shape is easier to seat without forcing sharp angles. I learned this the hard way with a faceted stone that needed more precise prongs than I had patience for that day. The wire-wrapped bezel is an immensely satisfying technique when you finally seat the stone and feel the bezel hold it gently but firmly.
Project 4: Simple wire-wrapped earrings
Earrings are an excellent way to practice symmetry, matched loops, and clean finishes because you’ll repeat the same piece twice. Choose a unified design—like a wrapped bead on a simple ear wire—and make both halves sequentially to keep them consistent. Balance and proportion are everything for wearable earrings.
- Make two identical headpins by threading a bead onto 22–24 gauge wire and creating a wrapped loop with round-nose pliers.
- Create or buy two matching ear wires from 18–20 gauge wire or use prefabricated findings for speed.
- Attach each wrapped bead to an ear wire and adjust alignment so both dangle the same distance.
- File and smooth any sharp ends, then polish and check for balance before photographing or packaging.
I recommend making four ear pairs at once when you’re comfortable with the process—one for practice, one for gifts, and two for the shop. That cadence builds skill and inventory efficiently.
Design considerations and troubleshooting
Design balance and scale
Proportion defines whether a piece feels elegant or awkward. Small beads on thick wire can feel out of scale, while fine wire with large, heavy stones will look delicate and may not be durable. Consider the wearer’s comfort and the piece’s intended use when choosing gauges, stones, and closures.
When designing a set—necklace, earrings, and ring—echo elements to create coherence: repeat a spiral motif, a bead color, or a hammered texture. This unity makes pieces feel curated and increases perceived value. In my early shop days I learned to photograph sets together; buyers responded to matching elements more than single standalone pieces.
If you’re uncertain about scale, create mockups with inexpensive base-metal wire to test proportions before committing to precious metals. It’s faster and less costly to iterate with copper or brass and then translate successful designs into sterling or gold-filled when ready.
Common problems and quick fixes
Sloppy wraps, uneven loops, and sharp ends are the most frequent beginner headaches. The remedy usually involves slowing down, using the right pliers for the task, and trimming and filing aggressively for safety. Keep a scrap bin for practice and accept that early pieces are prototypes rather than failures.
If a wrap slides or loosens, re-wrap from the base outward with steady tension and anchor the start with a couple of wraps in the opposite direction. For stubborn kinks in wire, use nylon-jaw pliers to gently straighten the section and file the end smooth. If a ring or bangle feels too tight, slowly expand it on a mandrel rather than forcing it over a knuckle; this preserves the shape and reduces the risk of cracking.
When a stone keeps popping out of its setting, reassess the bezel or prong contact points and add a small additional wrap or prong to secure the stone. Sometimes a tiny pinch with chain-nose pliers at strategic points is all that’s needed to keep a cabochon stable without over-tightening and risking damage.
Finishing, patina, and care
Polishing and surface finishes
Polish with a soft cloth for sterling and plated metals, and use a brass or silver polishing compound for tarnish removal where appropriate. For a satin finish, gently buff with fine steel wool or a non-woven abrasive pad rather than high-speed polishers, which can overheat delicate wire. Remember that hammered and matte surfaces hide scratches and are forgiving for daily wear.
If you choose to plate or tone pieces, make sure the base metal is properly cleaned and free of oils and residues. Plating is a specialized process often best outsourced unless you have the right equipment and ventilation. For patinas, liver of sulfur and other chemical treatments create dramatic darkening on silver, but practice on scraps first to understand reaction times and tones.
Sealers like Renaissance Wax can slow tarnish on copper and brass, but they alter the surface slightly and need reapplication over time. I keep small jars of wax in my kit for market touch-ups and recommend it for makers who want to offer low-maintenance pieces that still show the hand of the maker.
Packaging, labeling, and care instructions
Good packaging increases perceived value and protects delicate wirework during shipping. Use small jewelry boxes with soft inserts or organza bags for lighter pieces, and include a small card with metal content and care instructions. Clear labeling helps customers—especially those with metal sensitivities—understand what they’re buying and how to care for it.
Include short care notes like “Avoid water, perfumes, and chlorine” and “Polish with a soft cloth.” If pieces are plated, note that plating may wear over time and offer a repair or re-plating service if you plan to provide one. These details reduce returns and build customer trust, which is invaluable for small businesses.
For market or shop displays, use props that prevent tangling and show how the piece sits on the body—mannequin busts, earring stands, and ring cones all help. Presentation can make the difference between a casual glance and a sale.
Pricing, selling, and scaling your work
How to price handmade wire jewelry
Pricing jewelry fairly requires factoring in materials, labor, overhead, and a profit margin. Calculate the raw material cost precisely—wire measured by length or weight, beads, stones, and findings—then add your hourly labor at a reasonable wage. Include a portion of overhead such as tools, workspace, and packaging in the final price.
Don’t undervalue your time just to compete on price; handmade pieces carry the maker’s time and skill, which buyers often appreciate when presented with clear product stories. Consider a tiered pricing strategy: simple designs at accessible price points and more intricate, time-intensive pieces at higher prices. When I adjusted prices to better reflect my time, I lost a few price-sensitive buyers but gained customers who valued craftsmanship and returned for custom work.
Research similar makers in your niche to understand the market and position your brand. Keep clear records of production time per piece—this helps you price consistently and decide which designs are worth scaling up for production runs.
Channels for selling and growing your craft
Start local with craft fairs, consignment in boutiques, and trunk shows to gather direct feedback and sales experience. Online platforms like Etsy, Instagram, and your own website expand reach, but require better photography and clear branding to stand out. Pair online presence with consistent social media that shows your process and personality; buyers love the story behind handmade goods.
Wholesale and partnership with local shops can provide steady income but often require lower wholesale prices and reliable inventory. Balance wholesale with direct-to-consumer sales so you maintain margin and a direct relationship with your audience. I found combining weekend markets with a small online shop allowed me to test designs in person and scale the best sellers online the following season.
Finally, consider workshops as an income stream—teaching beginner wire skills in person or online lets you monetize your knowledge and build a community of repeat customers. Teaching also sharpens your skills, because explaining techniques reveals gaps you can then refine in your own work.
Practice plan: how to get better quickly

Daily and weekly exercises
Skill grows through repetition and focused practice. Set a simple daily goal—ten wrapped loops, five matched ear-wires, or one perfect coil—and you’ll build muscle memory faster than you expect. Short, regular practice beats occasional marathon sessions because it reinforces technique without fatigue.
Weekly goals should push complexity a bit further: weave a small panel, finish three identical rings, or create a wire-wrapped bezel for a medium-sized cabochon. Track improvements in a notebook or photo folder so you can see tangible progress and repeat successful settings. I still photograph my work after each practice session to compare results over months; the difference becomes motivating evidence of growth.
Return to fundamentals regularly; even advanced makers revisit basic wrapped loops and hammering techniques to stay sharp. Set aside a day every few months to make quick, simple pieces purely for speed and rhythm rather than perfection—these exercises improve workflow and production pacing.
Expanding your skills safely
As you try harder techniques, prioritize safety: wear safety glasses when cutting wire, keep files and sharp tools away from the body, and work in a well-lit space. If you use chemical patinas or polishing compounds, ensure good ventilation and read product labels carefully. Small injuries can derail progress, so good habits early on pay dividends.
Take classes, watch experienced makers, and join online communities for feedback and troubleshooting. Constructive critique accelerates learning and can reveal small adjustments that dramatically improve finish and durability. I attribute much of my early refinement to an informal critique group where makers exchanged tips and swapped problem pieces for hands-on fixes.
As your confidence grows, selectively invest in specialized tools—rolling mills, doming blocks, and wire-boring tools—that unlock new textures and repeatable forms. Buy tools that solve real problems for you rather than every gadget on the market; the right investment is the one you’ll use consistently.
Working with wire opens a practical, creative path into jewelry making that’s both approachable and deep. Start simple, practice deliberately, and let the small wins build your confidence as you move to more complex techniques. With steady effort and attention to finish, you’ll be making wearable, saleable pieces that reflect your hands-on design sensibility and craftsmanship.


